Emptying a urinary bag can be a challenging and time consuming feat, as the end used to empty the bag into the toilet is short, and one must stand with the bag over the toilet while waiting for it to drain slowly into the toilet. As such, events like spillage, unpleasant odors, and infection can be common. One could easily see how this process would be even more difficult to complete for someone who uses a power wheelchair; not only would it be hard for the user to get close enough to the toilet to efficiently empty the urinary bag, but also they may have difficulty reaching the flusher when finished. When adding the impact that disorders such as multiple sclerosis (MS) can have on one’s fine motor dexterity, this whole process becomes even more challenging. This was the reality that our client faced when managing his urinary bag.
This device was created as part of a class at McGill University called “Design of Assistive Technology: Principles and Praxis” where each group of students from various educational backgrounds was paired with a client in the community who had unique needs that were not being met by currently existing assistive technology. Our group consists of a biomedical engineering master's student, a physical therapy master's student, an occupational therapy master's student, and our client Mr. C.
The aim of this project to design our piece of assistive technology to aid urinary bag users in the toileting process when sitting in a power wheelchair, in a way that will minimize physical strain. This way, even users with limited manual dexterity can still operate this technology. This web page will contain a description of our client’s specific difficulty, our iteration process, as well as our earlier design ideas and prototypes. It also contains our final design, the materials and tools made to create it , and step by step instructions on how to replicate it.
Thank you for your interest in our design, and we hope you find the following information helpful in your quest to discover assistive technology that works for you.
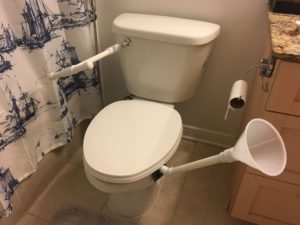
Figure 1: Set up of the urinary funnel and long reach flusher in a typical bathroom. Note the urinary bag extension and the pants are not pictured.
A) Design Challenge
Mr. C. has had multiple sclerosis (MS) for 19 years. He has an amazing and supportive family: his loving wife, daughters and multiple pets. Today, his main mode of mobility is his power wheelchair. Over the years, his condition has progressively affected his ability to use his hands in his daily activities. He faces many challenges, but he deems his difficulties in toileting as being very important for him to work on. First, emptying his urine bag poses a high risk of spilling and thus of infection. The smell of the spillage is also cause for concern. Second, the handle to flush the toilet is out of reach when Mr. C. is in his power wheelchair, and requires a lot of strength for him to operate. Third, to access his urine bag which is attached to his left leg, Mr. C. must unzip his pants from hip to ankle. As Mr. C has decreased core stability and manual dexterity, this is a difficult task for him.
Mr. C. would like an assistive technology solution that addresses all 3 problems and will ultimately minimize his risk of infection, chance of spillage (reducing unpleasant odors), and to maximize the abilities he currently has, while keeping in mind the progressive nature of his condition. One important constraint that needs to be considered is the size of his bathroom and how close he can get to his toilet when in his power wheelchair.
Up to now, Mr. C. and his wife have not found any adequate solution for the aforementioned challenges. The video below provides more detail on the problem our client faces.
B) Prototypes & Experimentation
B.1) Early Prototypes:
Figure 2: Early "works like" bricolage prototype, made from a plastic funnel, tubing and a urinary bag. Outlines what the ideal product would function like for our client when emptying his urinary bag from his power wheelchair.
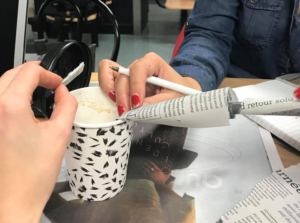
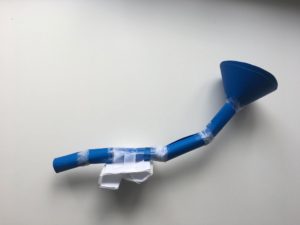
figure 3: Early "looks like" bricolage prototypes made from various materials. The image on the left was from an early brainstorming meeting using newspaper and a coffee cup to figure out what components would be needed for our final design. The image on the right was our final prototype at our midterm presentation used to demonstrate how our design for the urinary funnel would look like. It is constructed from Bristol board and Styrofoam sheets. We decided to stick with this shape and concept for our final design of the urinary funnel. Our client was happy with the design idea, and ideally wanted the toilet attachment (made in white Styrofoam in this prototype) to be adjustable so it could fit on any toilet bowl, so he may take it with him when he was out in the community.
B.2) Later Prototypes


Figure 4: Our prototype as of January 2018. Made from 2" diameter clear PVC pipes, 2" diameter PVC elbows (45 degrees and 90 degree) joints, and a large reducer. From the image on the left, you can see its size relative to the toilet. Firstly, it was too high relative to our client's knee, making it impossible to empty his urinary bag into it. Secondly it was very large and heavy, and our client reported wanting something smaller, easier to remove from the toilet and lighter for transport.
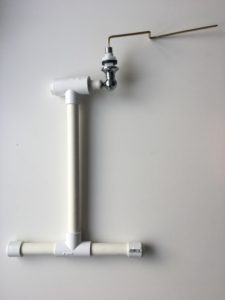
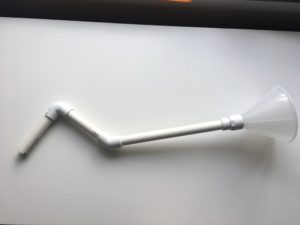
Figure 5: Our prototype for the urinary funnel and long reach flusher as of March 2018. The picture on the right is the urinary funnel made from 1/2" diameter PVC piping, 45 degree and 90 degree 1/2" diameter PVC elbow joints, a reducer and a funnel. The picture on the left is the long reach flusher made from a new flusher handle, 1/2" diameter PVC piping, PVC t-joints and caps. The client liked the size of the urinary funnel better than the January prototype and was able to operate the long reach flusher by pressing down and slightly rotating the long reach flusher. At this stage, we still needed to design the mechanism to connect the urinary funnel to the toilet bowl, how to extend the urinary bag to the urinary funnel, and how to adapt sports pants so the client could manage his urinary bag easily when emptying it into the toilet.
C) Final Product: Description, Materials, Fabrication and Operation
Figure 6: Urinary funnel
Figure 7: Long reach flusher

Figure 8: Urinary bag extension
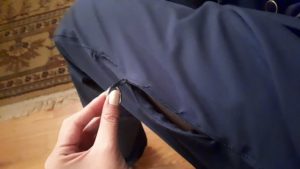 Figure 9: Adapted thigh zip pants
The final product delivered to our client consisted of 4 parts:
- (1) The urinary funnel is made of PVC piping, elbow joints, a funnel, and reducer (Figure 6). It is used to direct urine from the urinary bag attached to our client’s leg when sitting in his wheelchair, to the toilet. This funnel is attached to the toilet bowl with a U-shaped piece of PVC and screws, so it may be removed. However, it is not adjustable to all toilets.
- (2) The long reach flusher made of PVC piping, T-joints and caps (Figure 7). This is a T shaped extension from a typical flushing handle, that allows the client to flush and empty the toilet with two hands, and from farther away from the toilet when sitting in a wheelchair.
- (3) The urinary bag extension (Figure 8) elongates the free end of the urinary bag, so that it may lead directly into the urinary funnel and minimize spillage. This urinary bag extension will have a second closing mechanism on it, so that no urine trapped in the extension will spill out onto the client.
- (4) The thigh zip pants allows the client to unzip his pants up from his knee to his thigh (Figure 9). This facilitates the task of emptying his urinary bag by doing so without bending all the way over to unzip typical sports pants (zipper usually starts from the ankle).
Our client reported being very happy with the overall end product, and that it would fit his toileting needs. He was also excited to see this product benefit other people, with similar challenges in the future.
C.1 Measurements needed to make final device
Note: All measurements mentioned below were taken based on our client's toilet and his position relative to it when sitting in his power wheelchair. Dimensions and relative lengths should be adjusted depending on your needs. Ideally, the urinary funnel will fall below the user's knee so that the force of gravity can help the urinary bag empty.
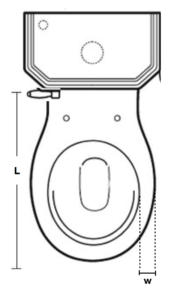
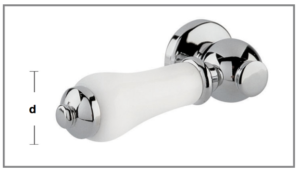
Figure 10: Measurements and where to take them on the client and their toilet.
Collect the following measurements:
w: toilet bowl lip width of desired point of attachment
l: from flush handle to end of bowl
d: flush handle diameter.
h: height from toilet bowl to client's knee (not pictured)
Read instructions below for each component of the device for formulas used with these dimensions to determine length of PVC pipes.
C.2 THE URINARY FUNNEL
Materials
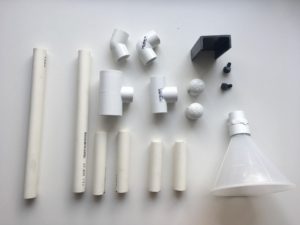
Figure 11: Materials needed to make urinary funnel and toilet bowl attachment.
For urinary funnel:
| # | Materials | Dimensions |
| 1 | PVC Pipe ½” Pipe Size |
1.5 feet |
| 2 | PVC Pipe Fitting
1x 90 Degree Elbow Connector 1x 45 Degree Elbow Connector Reducer |
½” Socket-Connect Female½” Socket-Connect Female ½” Socket-Connect Female½” Socket-Connect Female ¾” Socket Female x ½” Socket Female |
| 3 | PVC Plastic Funnel | Spout OD 1/2" Top OD up to 5" |
| 4 | PVC U-Channel | w" wide (width of toilet seat) 3” long |
| 5 | Chemical-Resistant PVC Hex Head Screws | 1/4" Thread Size, 1/2" Long |
For adhesives:
| # | Materials | Dimensions |
| 6 | Impact-Resistant Instant-Bonding Adhesive | - |
| 7 | Cleaner for PVC Plastic Pipe | - |
| 8 | Primer for PVC Plastic Pipe | - |
| 9 | Cement for PVC Plastic Pipe | - |
| 10 | Epoxy Structural Adhesive | - |
Tools & Machinery
- Note: images retrieved from linked websites, see tool name.
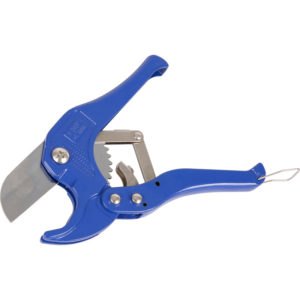
- Figure 12: Pipe cutter

2. Figure 13:Hand saw

3. Figure 14: Power drill
Instructions
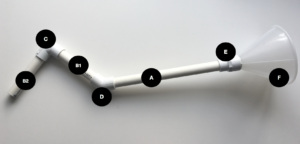
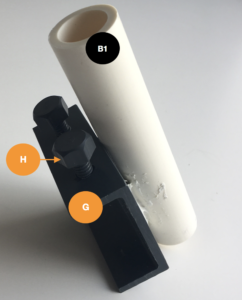
Figure 15: Instructional image to make the urinary funnel, with pieces labelled. Refer to this image for steps 1-12 below.
Step 1: Cut PVC Pipe into three pieces using the pipe cutter (figure 12). Lengths are based on the following equations. Refer to figure 15 for the letter assignments to pieces:
- For the length of the long PVC tube [A]: Length of tube= h (height from toilet bowl to client's knee)/ sin (45 degrees)
- For the length of the shorter PVC tubes [B1 and B2]: estimated based on width of toilet bowl. Want to make it so the elbow (adds about 1" in length) and the PVC pipe [B1] between the 90 degree elbow and the 45 degree elbow will sit well on the toilet bowl attachment. Will probably not need to be longer than 4".
- Based on the specifications of our client, his power wheelchair and his bathroom our PVC pipes measured the following: 10” [A], 4” [B1] and 4” [B2] respectively. For ease of reporting will refer to the following measurements in the steps below.
Step 2: Cut a U PVC channel [G] to 3" long using a hand saw (figure 13). The width of channel chosen depends on w (width of toilet bowl lip). For our client we chose a U PVC channel that was 2" wide.
step 3: Drill two 1/4" holes onto one surface of the PVC U channel [G] using a power drill (Figure 14)
Step 4: Screw in the 1/4" plastic screws [H] into these holes.
step 5: Attach the 4" pipes [B1] to the PVC U channel [G] using instant-bonding adhesive and let it dry. We recommend using the adhesive suggested in the materials list above. Use epoxy glue (explained in step 11) if needed.
Step 6: Connect the 45 degree elbow [D] connector to the 10” pipe [A] and the 4” pipe [B1]. Make a mark in pencil where the edge of the elbow connector [D] and the tubes [A, B1] meet when connected together.
Step 7: Connect the 90 degree elbow [C] connector to both 4” pipes [B1, B2]. Make a mark in pencil where the edge of the elbow connector [C] and the tubes [B1,B2] meet when connected together.
Step 8: Connect the 1/2” (smaller) opening of the reducer [E] to the 10” pipe [A] Make a mark in pencil where the edge of the reducer [E] and the tubes [A] meet when connected together.
Step 9: Connect the bigger opening of the reducer [E] to the funnel [F]. You might need to shorten the funnel’s spout using the pipe cutter (figure 12).
Step 10: Before gluing the parts together, make sure that the device as a whole will fall below the user's knee, when the toilet bowl attachment sits on the lip of the toilet bowl. Steps 5-9 involves you slotting pieces together without glue, so you can assess if the length of your PVC piping is the right size. If it is too high relative to the user's knee, cut pipe [A] using a pipe cutter (figure 12).
Step 11: Use the epoxy glue to permanently attach the funnel [F] to the reducer [E]
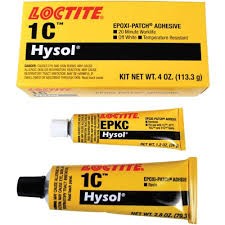
Figure 16: Epoxy glue.
- Read the instructions on the products before using.
- Mix one part of each tube and apply on the inner edge of the reducer [E] and the outer edge of the funnel’s [F] spout.
- Stick the reducer and funnel together.
- Leave to dry.
Step 12: Use the cleaner, primer then cement to permanently attach PVC piping [A, B1, B2], elbows [D, C] and reducer [E] together
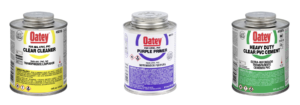
Figure 17: Cleaner, primer and PVC cement.
- Read the instructions on the products before using. Some solvents will dry within 2 minutes so you will need to work quickly.
- Using the cleaner solvent, brush solvent onto the newly cut edges of the pipes [A, B1, B2] to clean.
- Apply a layer of primer to the inner edges of the elbows [C,D] and the reducer [E] and the outer edges of the pipes [A, B1, B2] up until the pencil line made in steps 6-8 .
- Apply a layer of cement to the inner edges of the elbows and the outer edges of the pipes [A, B1, B2] up until the pencil line made in steps 6-8.
- Attach the elbows [C,D] and the reducer [E] to the pipes [A,B1, B2].
C.3 THE LONG REACH FLUSHER
Materials
For long reach flusher:
| # | Materials | Dimensions |
| 1 | PVC Pipe ½” Pipe Size |
1.5 feet |
| 2 | PVC Pipe Fitting
Inline Tee Reducer Inline Tee Adapter |
1” Socket Female x ½” Socket Female ½” Socket Female x ½” Socket Female |
| 3 | Standard-Wall PVC Pipe Fitting for Water
2x Cap Cap |
½” Pipe Size Socket-Connect Female 1” Pipe Size Socket-Connect Female |
For adhesives:
| # | Materials | Dimensions |
| 4 | Impact-Resistant Instant-Bonding Adhesive | - |
| 5 | Cleaner for PVC Plastic Pipe | - |
| 6 | Primer for PVC Plastic Pipe | - |
| 7 | Cement for PVC Plastic Pipe | - |
| 8 | Epoxy Structural Adhesive | - |
Tools & Machinery
- Note: images retrieved from linked websites, see tool name.
Instructions

Figure 19: Instructional image of fabrication of long reach handle. Refer to this image for instructions below.
Step 1: Cut PVC Pipe into three pieces using the pipe cutter (figure 18). Measurements are calculated using following:
- The length of pipe [I] is measured based on measurement l (the measurement from the user's current flusher to the edge of the toilet bowl. The length of pipe [I] could be shorter than this distance depending on how close the user can get his wheelchair to the toilet. Always test lengths first before gluing pieces together.
- The length of pipes [J1, J2] just needs to be long enough so the user can hold it with their hands. 3" should be sufficient.
- In the case of our client, the pipes measured 10” [I], 3” and 3” [J1, J2] respectively.
Step 2: Connect the T-joint [N] to the flush handle [O]. Using a pencil, make a line where the edge of T-joint [N] touches the flusher handle [O]. In this case we used the end of the T-joint [N] that was approximately 1/2" in internal surface diameter , as d (the diameter of the flusher handle) was also 1/2". Connect a cap [M] to the other (free) side of the T-joint [N].
Step 3: Connect the remaining free face of the T-joint [N] to the 10” pipe [I]. Using a pencil, make a line where the edge of T-joint [N] touches pipe [I].
Step 4: Connect the free edge of the 10” pipe [I] to a T joint [L]. Connect the 3” pipes [J1, J2] using the two open ends of T-joint [L]. Using a pencil, make a line where the edge of T-joint [L] touches the pipes[I, J1, J2].
Step 5: Close the free ends of the 3” pipes [J1, J2] by connecting caps [K1, K2]. Using a pencil, make a line where the edge of Caps [K1, K2] touches the pipes [J1, J2]. Make sure you differentiate which pencil line corresponds to the T-joint [L] and which pencil lines correspond to the cap [K1, K2]
Step 6: Mock-set up the long reach flusher, by holding it against the outer side of the tank of the toilet, where the flushing handle is normally located. Ensure the user is able to reach the extended handle, and move it from their Wheelchair.
Step 7: Use the epoxy glue to permanently attach the T-joint [N] to the flush handle [O].
Figure 20: Epoxy glue.
- Read the instructions on the products before using.
- Mix one part of each tube and apply on the inner edge of 1/2" opening of T-joint [N] and the surface of the flusher handle, to the pencil line made in step 2.
- Stick the flusher handle [O] and the 1/2" opening of the T-joint [N].
- Leave to dry.
Step 8: Use the cleaner, primer then cement to permanently attach pipes [I, J1, J2], caps [K1,K2,M] and T joints [L,N] together.
Figure 21: Cleaner, primer and PVC cement.
- Read the instructions on the products before using. Some solvents will dry within 2 minutes so you will need to work quickly.
- Using the cleaner solvent, brush solvent onto the cut edges of the pipes.
- Apply a layer of primer to the inner edges of the T-joints [L,N] and the outer edges of the pipes [I, J1, J2], up until the pencil lines drawn on.
- Apply a layer of cement to the inner edges of the T-joints [L,N] and the outer edges of the pipes [I, J1, J2], up until the pencil lines drawn on.
- Attach the T-joints [L,N] and the pipes [I, J1, J2] together.
- apply a layer of primer to the inner edges of caps [K1,K2], the outer edge of pipes [J1, J2] up until pencil line, the outer edge of cap [M], and the inner edge of T-joint [N].
- Apply a layer of cement to the inner edges of caps [K1,K2], the outer edge of pipes [J1, J2] up until pencil line, the outer edge of cap [M], and the inner edge of T-joint [N].
- Attach the Caps [K1,K2] to the pipes [J1, J2], and the Cap [M] to the T-joint [N].
C.4 THE URINARY BAG EXTENSION
Materials
| # | Materials | Dimensions |
| A | 2 Hollister 9805 Leg Bags with Sterile Fluid Pathway | Large 32oz. (900ml) |
Tools & Machinery
- Note: images retrieved from linked websites, see tool name.
- Figure_: Scissors
Instructions


Figure 22: Instructional image of fabrication of urinary bag extension . Refer to this image for instructions below.
Step 1: Cut the tube [R] that usually attaches to user from an extra urinary bag [P] into 3” inch segments.
- Note: The length of the extension is based on our client's preference, and how close he could get to the toilet in his power wheelchair. It should be long enough so that it can sit inside the funnel of the Urinary funnel easily when user uses device.
Step 2: Remove the closing valve [Q] from the same extra urinary bag [P].
Step 3: Attach 3" tube extension segment [R] to the end of the closing valve [T] of the Urinary bag [S] that the client is going to use.
Step 4: Attach the closing valve [Q] to the other end of the 3" tube extension segment [R] to seal extension off after use.
C.5 THE THIGH ZIP PANTS
Materials
| # | Materials | Dimensions |
| A | 1 Pair of pants | Fit to person |
| B | One-way separating Zipper | 10’’ |
| C | Thread for the sewing machine | --- |
| D | Key chain ring | Fit to person |
Tools & Machinery
- Note: images retrieved from linked websites, see tool name.

- Figure 23: Sewing machine.
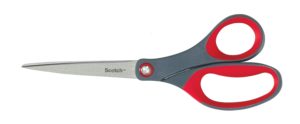
2. Figure 24: Scissors.
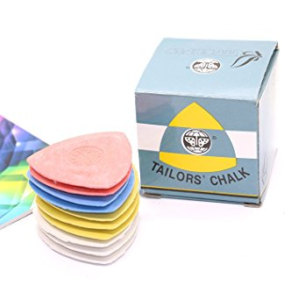
3. Figure 25: Chalk.
Instructions
Step 1: (Recommendation) Draw a line of 10" (or as long as the zipper) from knee up to the waist on the pant leg corresponding to the leg the user wears their urinary bag on, to demarcate the opening of the pants using chalk (Figure 25).
Step 2: Cut 10'' (or length of line drawn in step 1) along the seam on this same pant leg, at the outer thigh portion (or where users urinary bag is located) from the knee up using scissors (figure 24).
Step 3: Sew the one side of the tape of the zipper (figure 26) with the front surface of the pants using sewing machine (Figure 23). Repeat with the other tape (figure 26) width and the back part of the pants using sewing machine (figure 23).
Step 4: Add a key chain ring on the tab to facilitate grasping. You can also wrap a small piece of material around this key ring to increase the area of hold.

Figure 26: various components of a zipper.
C.6 operating our device: Instructional videos
Operating the urinary funnel and urinary bag extension
- Unfold leg urinary bag, so that it is flat on your thigh, and the extension is lies flat underneath it
- Move your wheelchair to required proximity from toilet bowl, such that the extension can reach into urinary funnel securely. Make sure the funnel falls under the users leg; they may use the tilt option on their power wheelchair to move their leg higher than the toilet if necessary/ possible.
- Open the secondary closure attachment (at bottom of extension) and at the original closing of the urinary bag.
- Apply pressure to urinary bag to drain urine from bag, into the funnel until the bag is empty .
- Ensure all urine in the urinary bag extension is shaken out into the funnel, then close first and secondary closures.
- Remove extension from funnel, re-position leg bag in resting position on leg, and zip up thigh zip pants.
- (Optional) Pour antibacterial cleaning solution into the urinary funnel after use, to ensure that it is clean and reduce the risk of infections.
Operating the long reach flusher
- Using one or two hands, pull the flusher down and rotate slightly counter clockwise (away from the toilet) to flush.
D) Product information and details from the suppliers:
Items #1- 15 (see table below) purchased from: McMaster-Carr
Item #16 (see table below) purchased from: Amazon
Item # 17 (see table below) purchased from: Canadian Tire
Item # 18 (see table below) purchased from: Fabricville
item # 19 (see table below) purchased from: Walmart
item #20 (see table below) purchased from: L'Équipeur
| Item # | Material | Price | Product # |
| 1 | Standard-Wall Unthreaded PVC Pipe, 1/2 Pipe Size, 5 Feet Long | 3.12$ | 48925K91 |
| 2 | Standard-Wall PVC Pipe Fitting, 90 Degree Elbow Connector, White, 1/2 Socket-Connect Female | 0.30$ | 4880K21 |
| 3 | Standard-Wall PVC Pipe Fitting, 45 Degree Elbow Connector, White, 1/2 Socket-Connect Female | 0.50$ | 4880K31 |
| 4 | Standard-Wall PVC Pipe Fitting, Reducer, 3/4 Socket Female x 1/2 Socket Female | 0.50$ | 4880K681 |
| 5 | Epoxy Structural Adhesive, Loctite 1C, 4 oz. Tube | 11.17$ | 1813A221 |
| 6 | 16 oz. Plastic Funnel with Vapor-Lock Resistant Ridges | 2.51$ | 4383T4 |
| 7 | 8 oz. Cleaner for Pipe Cement for Plastic Pipe | 4.87$ | 74605A44 |
| 8 | Pipe Cement for Plastic Pipe for 6" Maximum Diameter PVC, CPVC & ABS Plastic Pipe, 8 oz | 5.38$ | 74605A24 |
| 9 | Primer for Pipe Cement for Plastic Pipe, Clear, 8 oz. Brush-Top Can | 5.51$ | 18815K31 |
| 10 | PVC U-Channel, 2.51" Wide x 0.787" High Outside Size, 5 Feet Long | 26.22$ | 85065K55 |
| 11 | Chemical-Resistant PVC Hex Head Screw, 1/4"-20 Thread Size, 1/2" Long (5 pcs.) | 7.73$ | 95841A538 |
| 12 |
Standard-Wall PVC Pipe Fitting: Inline Tee Reducer, 3/4 Socket Female x 1/2 Socket Female
|
0.38$ |
4880K41 |
| 13 | Standard-Wall PVC Pipe Fitting: Inline Tee Adapter, 1/2 Socket Female x 1/2 NPT Female | 0.50$ | 4880K392 |
| 14 | 2x Standard-Wall PVC Pipe: Cap, White, 1/2 Pipe Size Socket-Connect Female | 0.27$ | 4880K51 |
| 15 | Standard-Wall PVC Pipe Fitting: Cap, White, 1 Pipe Size Socket-Connect Female | 0.50$ | 4880K53 |
| 16 | Hollister urinary bag (box of 10 urinary bags) | 57.44$ | 9805 |
| 17 | Belanger teapot tank lever (Flusher handle) | 24.99$ | 063-5236-0 |
| 18 | COSTUMAKERS Activewear One Way Separating Zipper, 23 cm (9”) | 3.80$ | 6023169 |
| 19 | Keychain loop (10 pcs) | 10.29$ | -- |
| 20 | Sport pants (Brand: Matrix) | 59.99$ + tax | 2BDEMXSP81-956 |
Last edited: April 2018