Literacy App Project - Snap&Go
A) Introduction to Summit School & the aim the project:
https://amara.org/en/videos/Tgbx6BsEuEU3/info/literacy-app-video/
Password to access the video: 12345
B) Design Challenge:
Snap&Go is an application that was designed in collaboration with Summit School. This private school, which is subsidized in the public interest by the government, services students with special needs from 4 to 21 years old. Primarily, students attending Summit School present with intellectual disabilities, autism, and/or behavioural and emotional disturbances. Many dedicated professionals (educational consultants, occupational therapists, physical therapists, speech-language pathologists, psychologists, social workers, etc.) work together in an interdisciplinary model to provide an optimal learning environment to Summit students.


The design challenge emerges from the situation when students are asked to participate in class activities that require literacy skills (i.e. being able to read printed text). Students all have different levels of literacy skills and require different levels of help. Plus, as classes have a ratio of about 1 teacher : ≈10 students, a teacher cannot give assistance in the activity to all students at the same time. Thus, each student has an iPad that contains apps and tools to assist them in participating more independently in activities requiring literacy skills, such as workbook-based exercises.
The 2 main apps used by Summit School in the context of literacy are SnapType Pro and ClaroPDF. SnapType Pro is mostly used with students who have fine motor difficulties and cannot write with a pen/pencil. It allows students to take a picture of their worksheet and then input text directly on the picture. It is thus mostly used as an alternative writing tool.ClaroPDF is used with students who have both reading and writing difficulties as it has both the functions of inputting text and text to speech.
Yet, both of the aforementioned apps have issues related to this specific context and fail to completely meet the needs of Summit School students. Indeed, the main complaints about the app from the Summit team are as follows:
SnapType Pro:
- There is no text-to-speech function => does not meet the need of students with reading difficulties
ClaroPDF:
- Unintuitive use => very busy interface with necessary tools
- Too many steps to access the needed functions
- Images disrupt the reading flow of the text-to-speech function
- Glitchy camera
Thus, Snap&Go’s purpose is to provide an accessible and intuitive platform from which students can access tools compensating for their difficulties in order to increase their independence in participating in class activities requiring literacy skills. To be deemed successful, the app has to provide the necessary tools to facilitate in-class activities for both students with writing and reading difficulties. At the same time, the app needs to have a stripped-down and intuitive interface in order for students to be able to use it independently.
The following are the success metrics set in collaboration with the Summit team that would confirm whether Snap&Go is successful in achieving its purpose or not:
- Teachers’ perspectives about the smooth running of their class activities involving literacy will have improved upon using the app.
- The app will reduce the number of times a teacher needs to assist the students to participate in their class activities involving reading by at least 2 occurrences by class.
- The OCR converter within the app will have a 98%-word-conversion accuracy under varying conditions (e.g. lighting conditions).
Unfortunately, due to the COVID-19 situation, in-class testing of the app has been impossible up to now. Success metrics thus still remain unexamined.
C) Prototypes and Experiments:
The front-end and functionality prototypes of Snap&Go were discussed over Google Slides. By front-end, it is meant as both the UI elements and the connection of the front-end to back-end services. Here is the timeline of the most salient modifications that lead to the final front-end and functionality prototypes:
October 30, 2019:
Initial mock-ups of front-end of the app with its hypothetical functionalities:

October 31, 2019:
Updates on following mock-ups and functionalities:
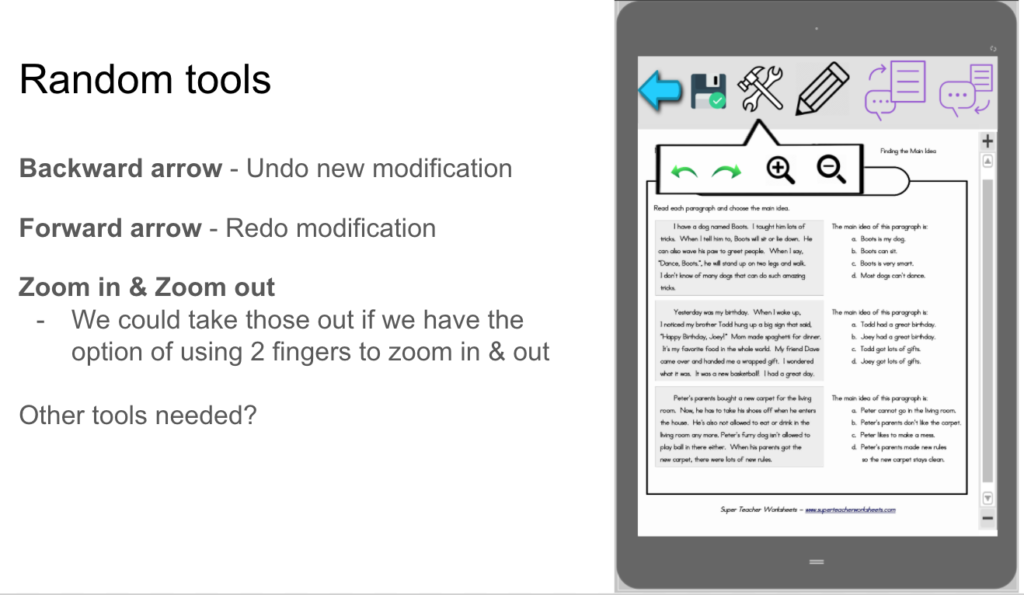
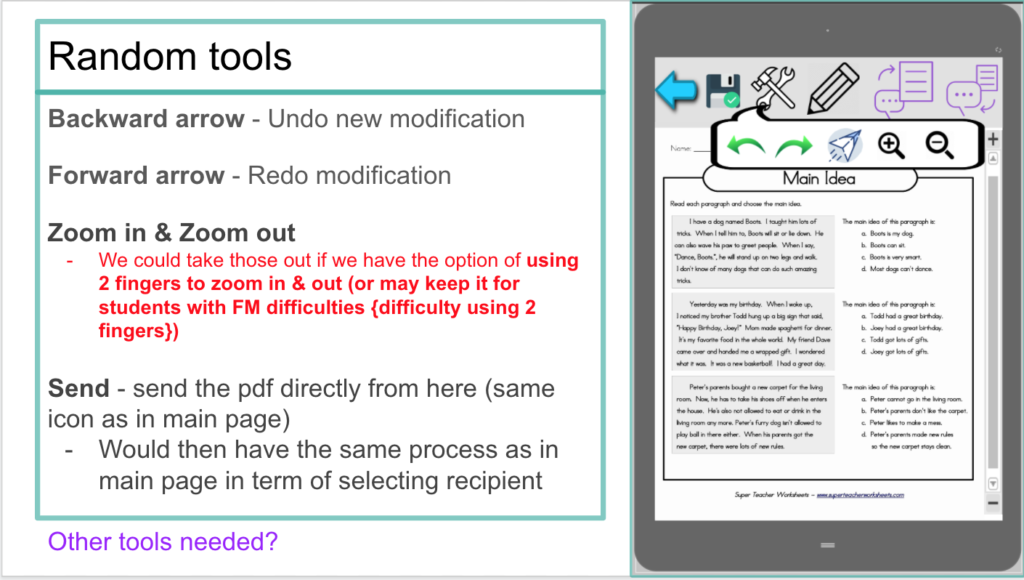
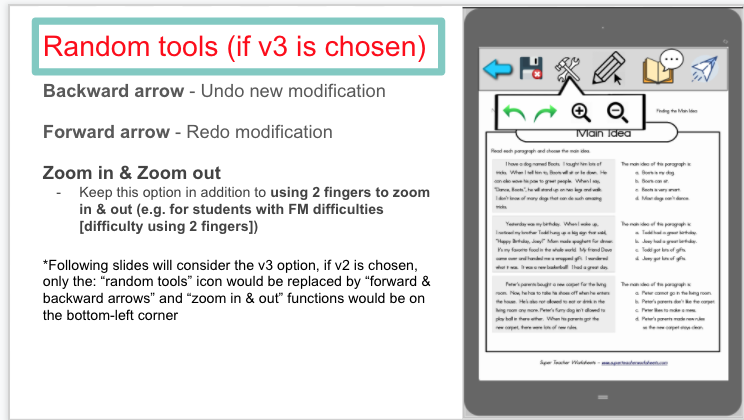
- Random tools (alternative for the zoom tool)
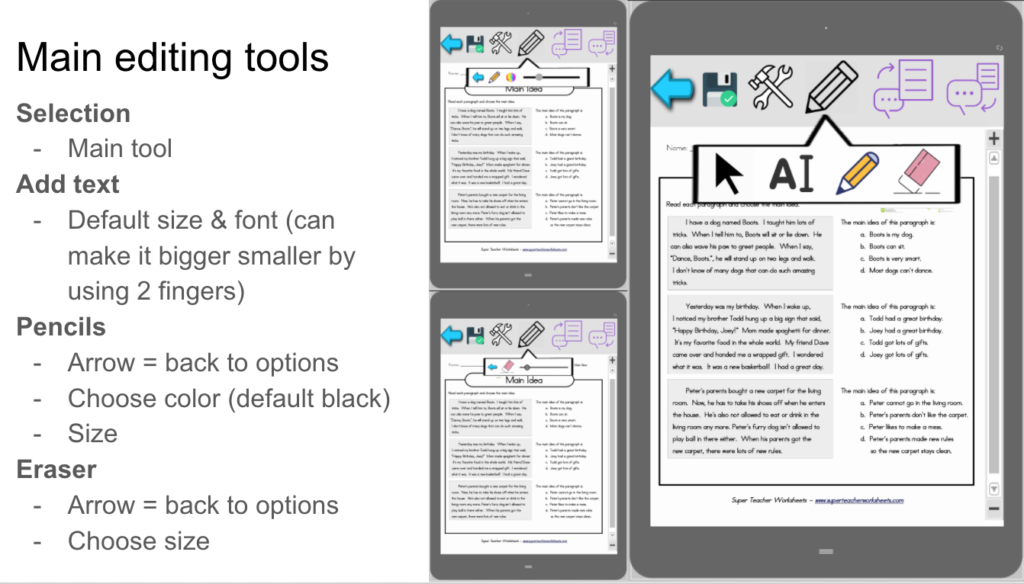
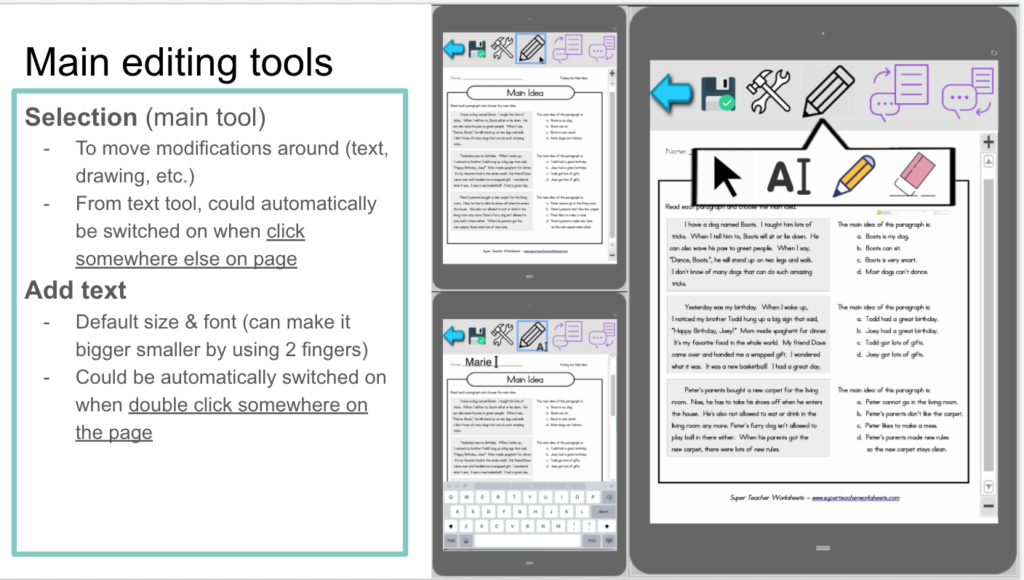
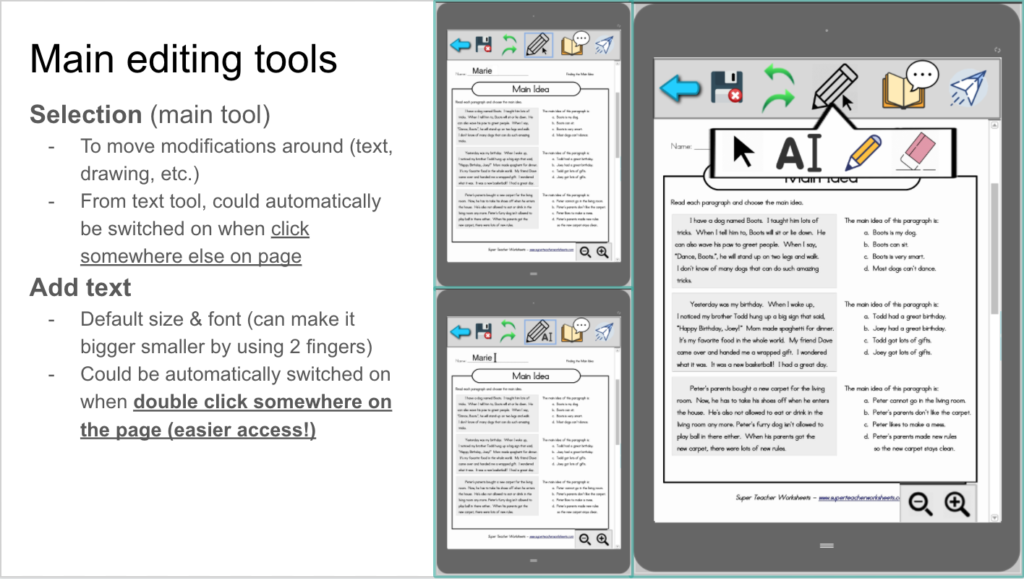
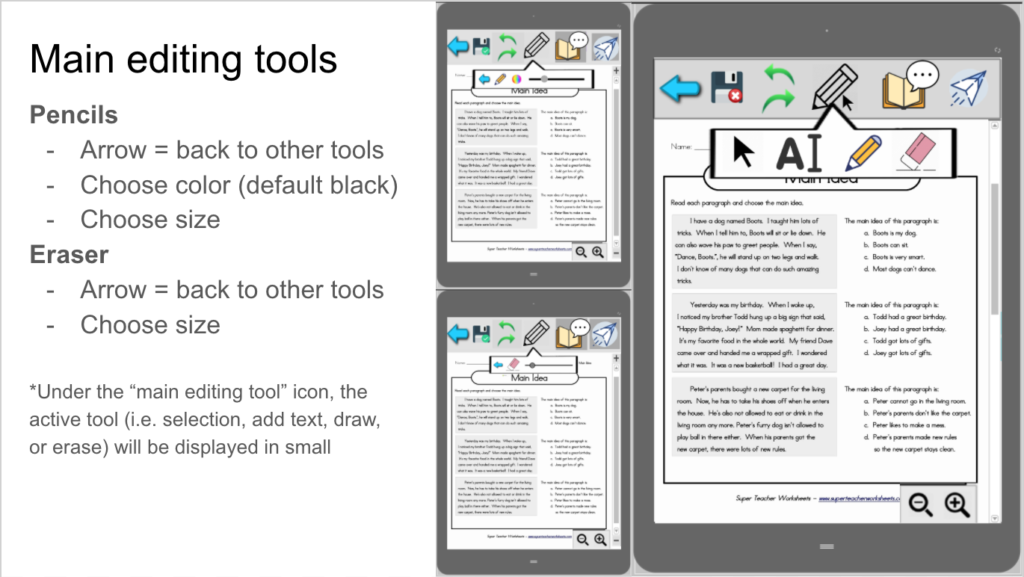
- Main editing tools (description of selection and add text tools).


November 5, 2019:
Updates on following mock-ups and functionalities:
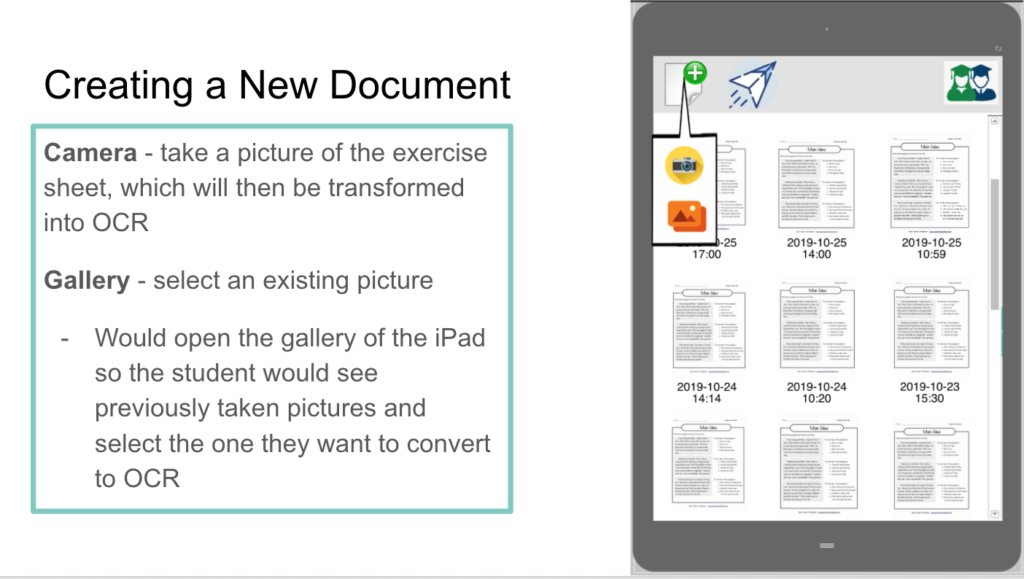
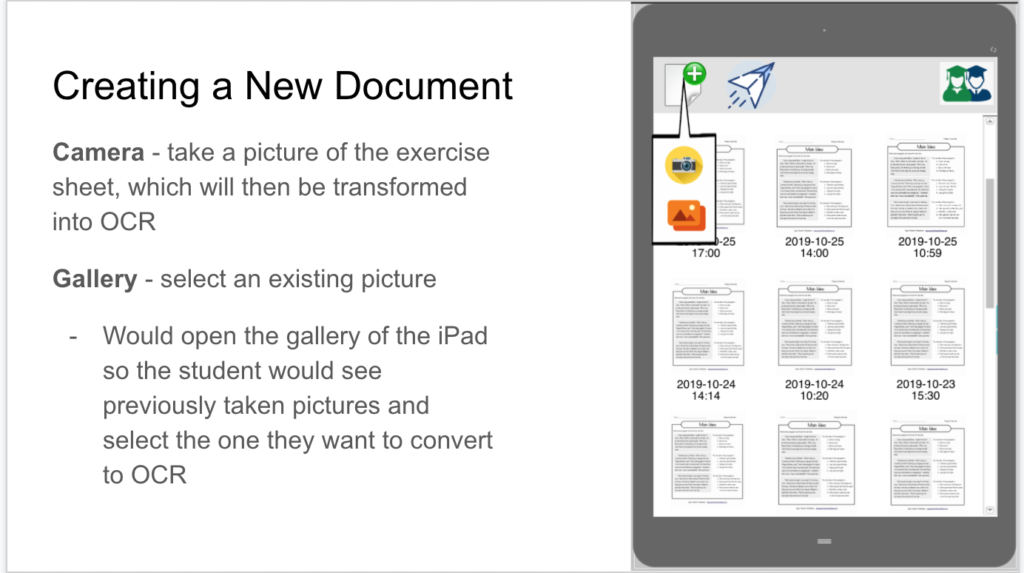
- Creating a new document (description of the gallery option)
- Take a picture (automatic picture taking function back in revision because of programming feasibility issues)
- Random tools (send function added)
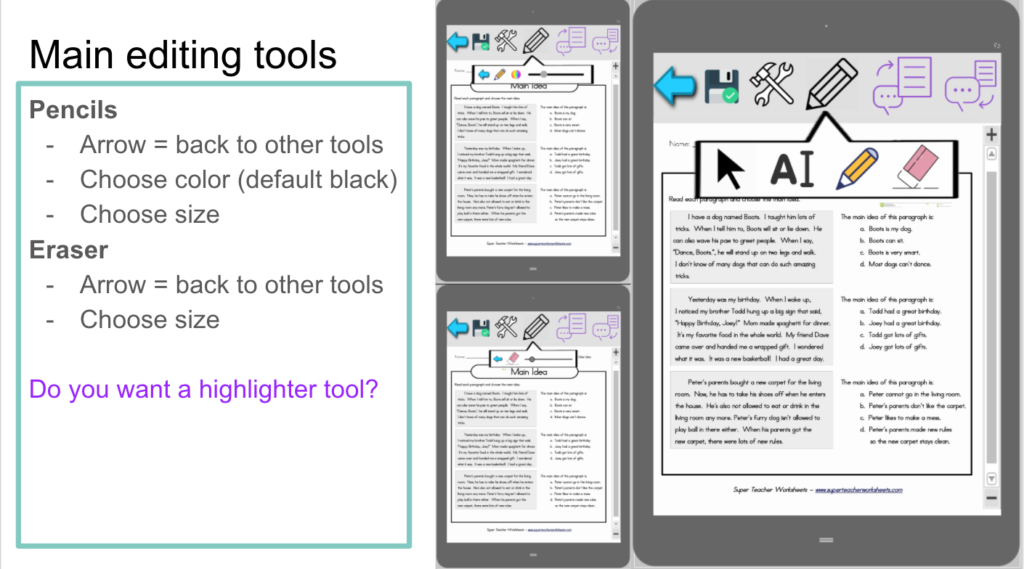
- Main editing tools
- Text to speech

Mock-ups and functionalities added:
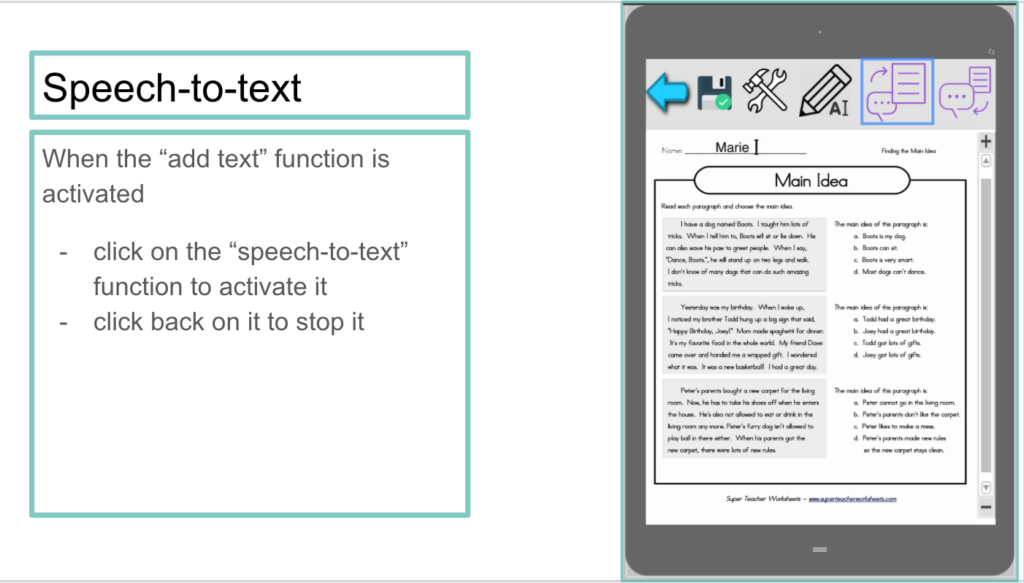
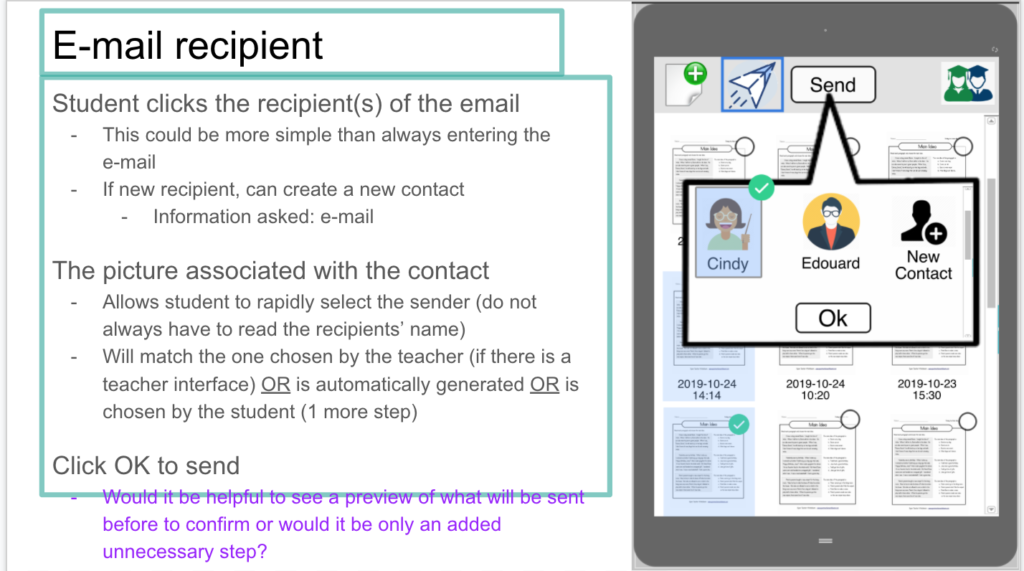
- Sending files to teacher; E-mail recipient; User menu; Speech to text

November 10, 2019:
Updates on following mock-ups and functionalities:
- Email recipient: added further explanation on functionality of email recipient step.
November 11, 2019:
Updates on following mock-ups and functionalities:
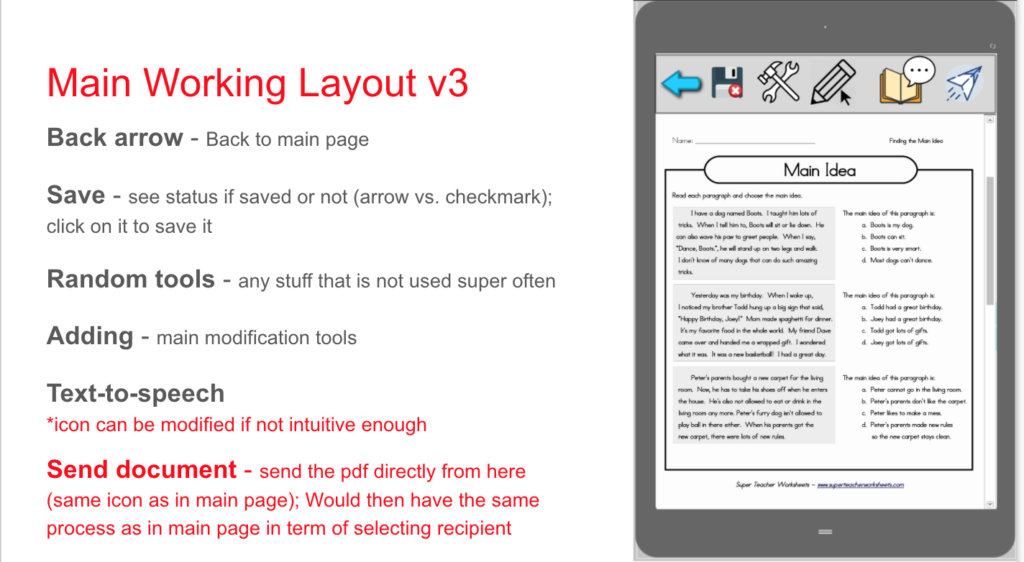
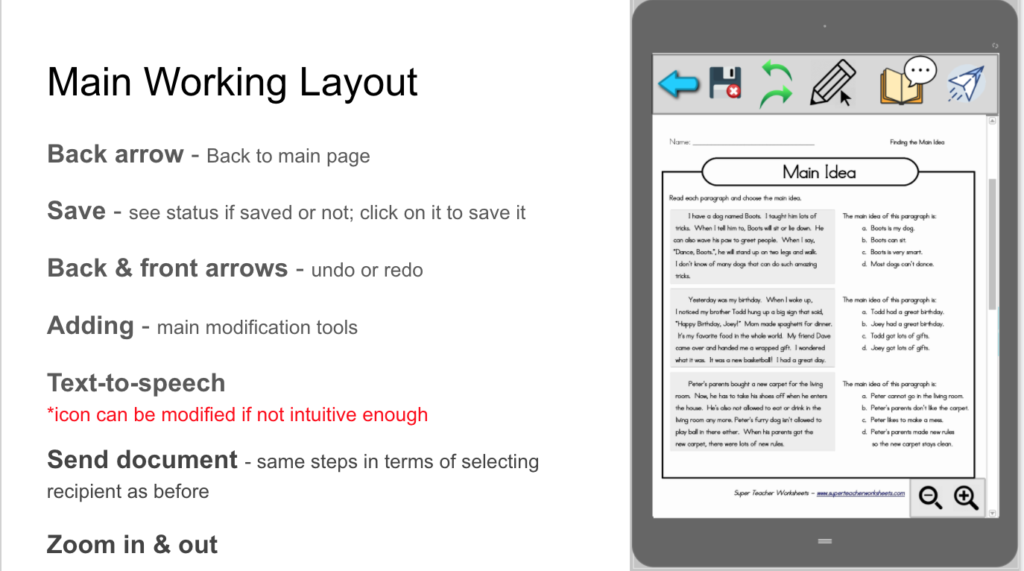
- Main working layout: 2 new versions created, added send function, changed text-to-speech icon (feedback from Summit School: previous one was not intuitive enough)
- Random tools: changed text to speech icon
- Main editing tools: changed text to speech icon
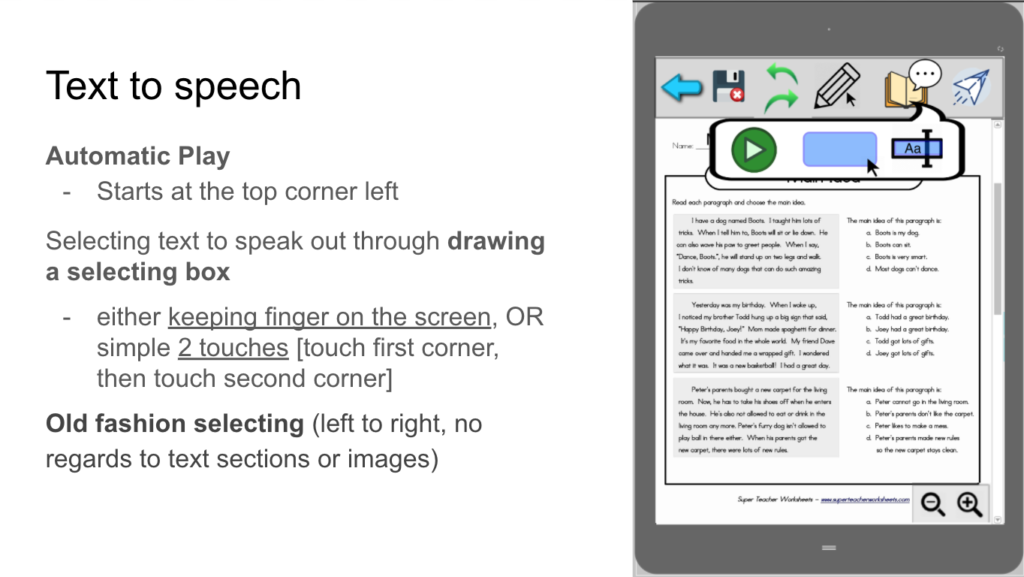
- Text to speech: added description of old fashion selecting tool


Mock-ups and functionalities added:
- Send document from main working area

Mock-ups and functionalities removed:
- Speech to text: feedback from Summit School: function not needed

November 15, 2019:
Updates on following mock-ups and functionalities:
- Text to speech: added description of text to speech tool

November 18, 2019:
Mock-ups and functionalities added:
- Sign up / Log In; Sign up (part 1); Sign up (part 2); Log In


November 25, 2019:
Updates on following mock-ups and functionalities:
- Sign up (part 1): added description of sign up step
- Login: added description of login step
- Main working layout: layout version 2 was chosen (according to feedback from Summit School)

Mock-ups and functionalities added:
- Issues with Login - wrong password; Issues with Login - wrong email


Mock-ups and functionalities removed:
- Main working layout version 3: version 2 was chosen (according to feedback from Summit School)
- Random tools version 3: version 2 was chosen (according to feedback from Summit School)


November 27, 2019:
Updates on following mock-ups and functionalities:
- Text to speech: addition of what the stop button would look like
Other feedback received from Summit School:
- Approved the suggested name for the app
- Approved the guiding questions in Sign up / Login page
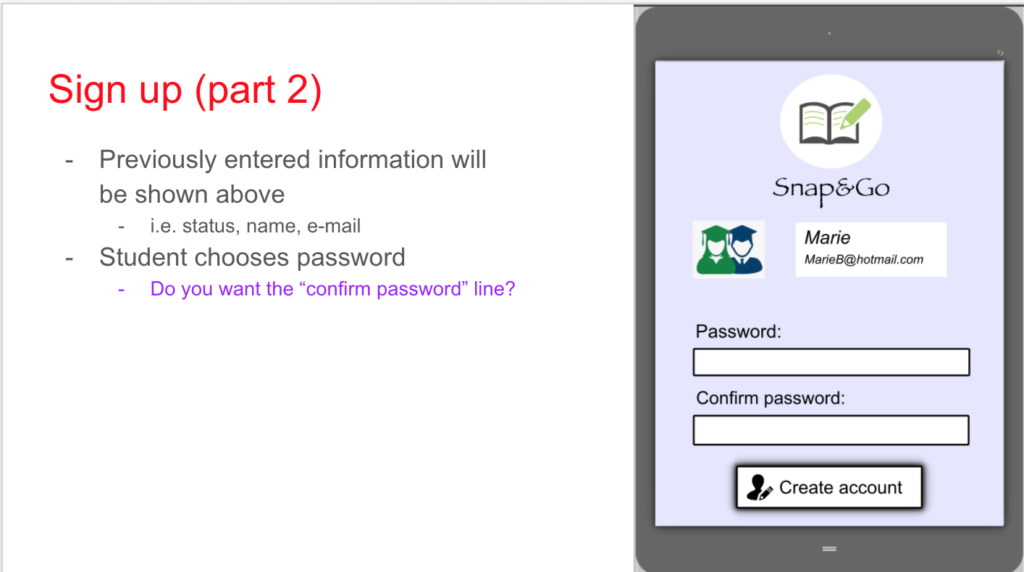
- Agreed to keep the “confirm password” line
- Agreed with the format of Sign up and Login pages
Final front-end and functionality prototypes:


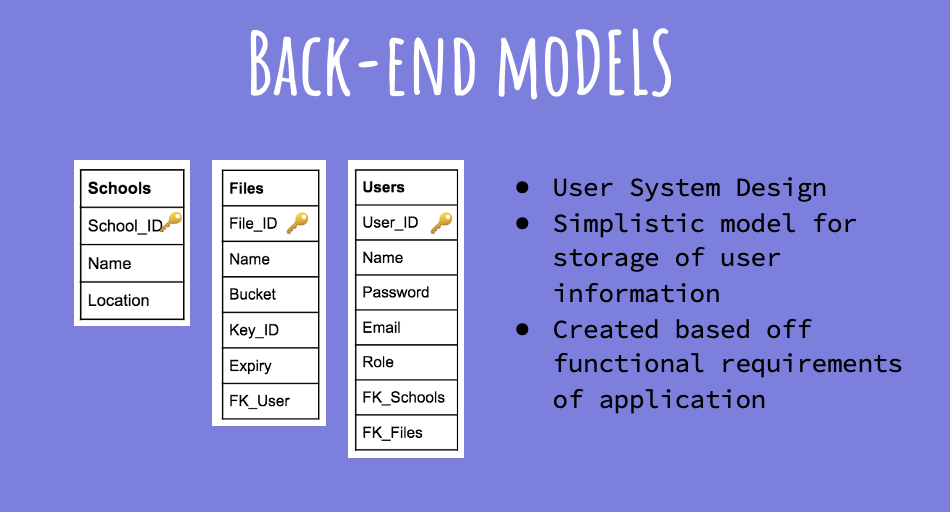
Back-end prototype(s) of Snap&Go
Back-end refers to the elements of the app that the user does not see, including user code, database, storage systems, and deployment.
Initial database model:

Initial class system model:
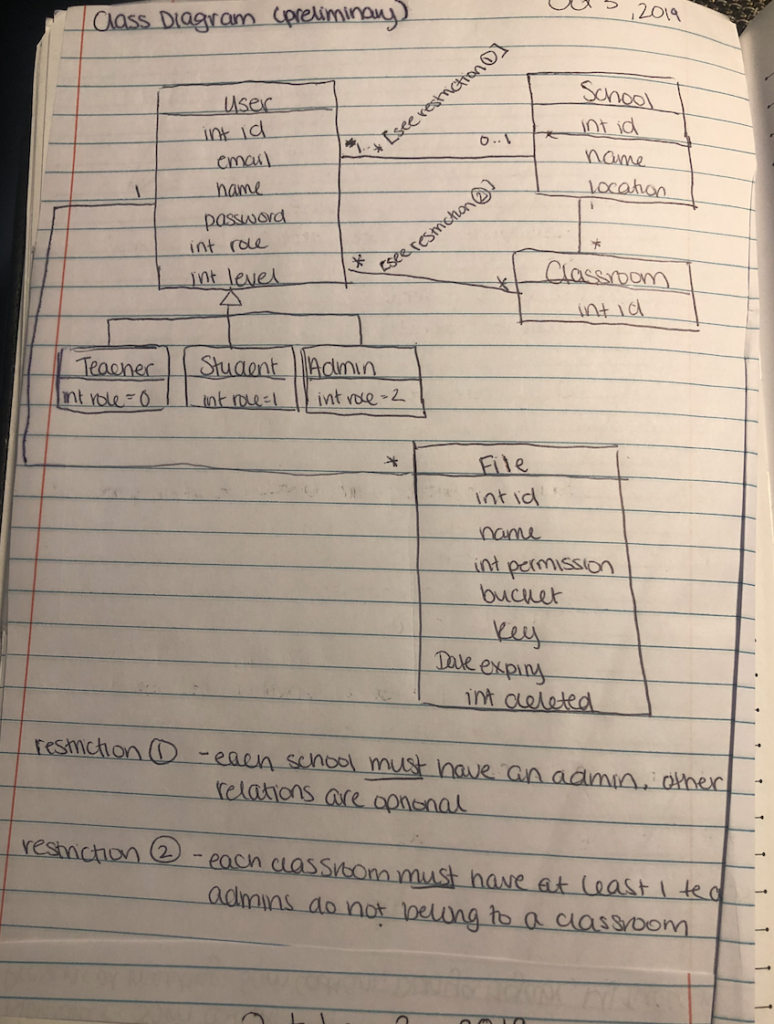
Final database model corresponding to a class system:
Complete app prototype(s)
N/A: Snap&Go that is available on the Apple Store now is the first and only combination of both front and back end
D) Final Solution:
Snap&Go
Snap&Go is now an app that is downloadable from the App Store for free and that is thus accessible for everyone. Its main features are picture-to-PDF conversion, OCR, text to speech, file creation and manipulation, email functionalities, and various PDF markup features. Currently, Summit School is not pleased with the existing technologies available on the App Store. The final solution that the Summit team and our main development team have come up with over the course of two semesters is an application that is easily understood by students with special needs and combines all features that are currently spread out throughout the various apps they use. Below are screenshots of the final app layout. This version contains the main functions that were discussed with Summit School. Some functionalities present in the front-end final prototype are not yet integrated in the app because of timing issues and they seem out of the engineering students’ realm of skills at the moment. Snap&Go will likely continue to improve over the summer.
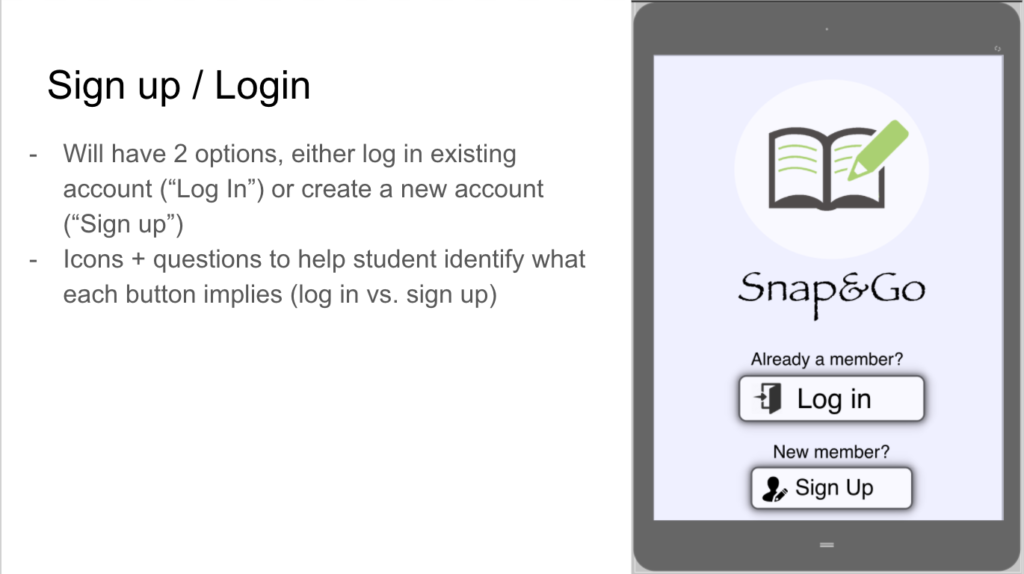
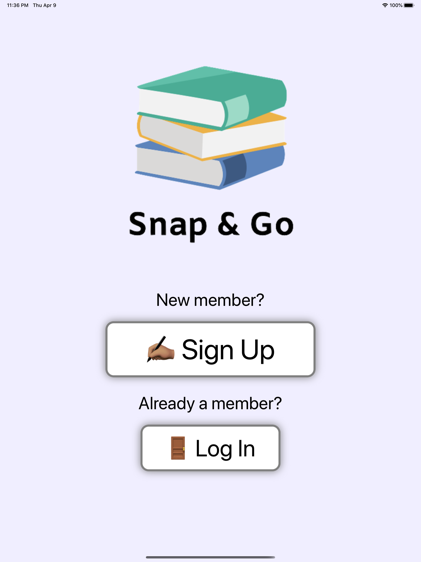
Welcome Page
On this page, you may either log in as a returning user or sign up and create a new account.
- Press on the Sign Up (
) icon if you are a new member.
- Press on the Log In (
) icon if you are a returning member.
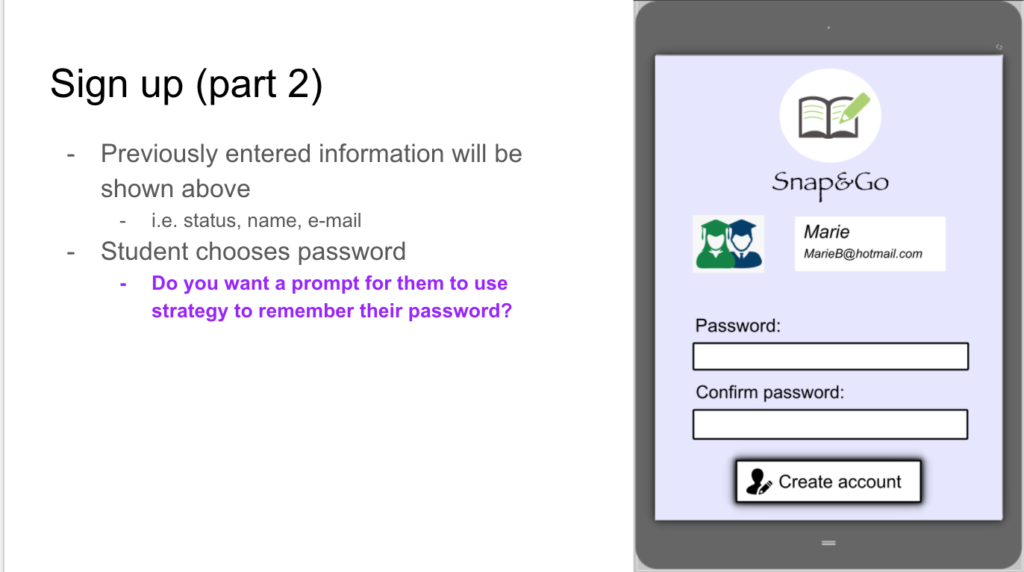
Signing Up:
- Type your full name.
- Type the email address you want to use to create your Snap&Go account.
- Select your role: “student” or “teacher”
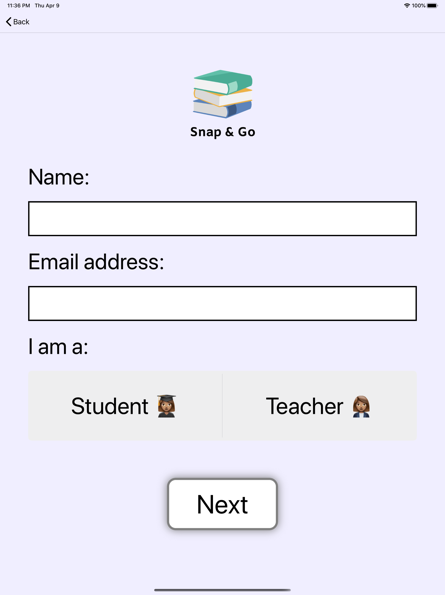
- Press on Next (
).
- Type in your chosen password in the space provided.
- Re-type your chosen password in the space provided.

- Press on Create Account (
).
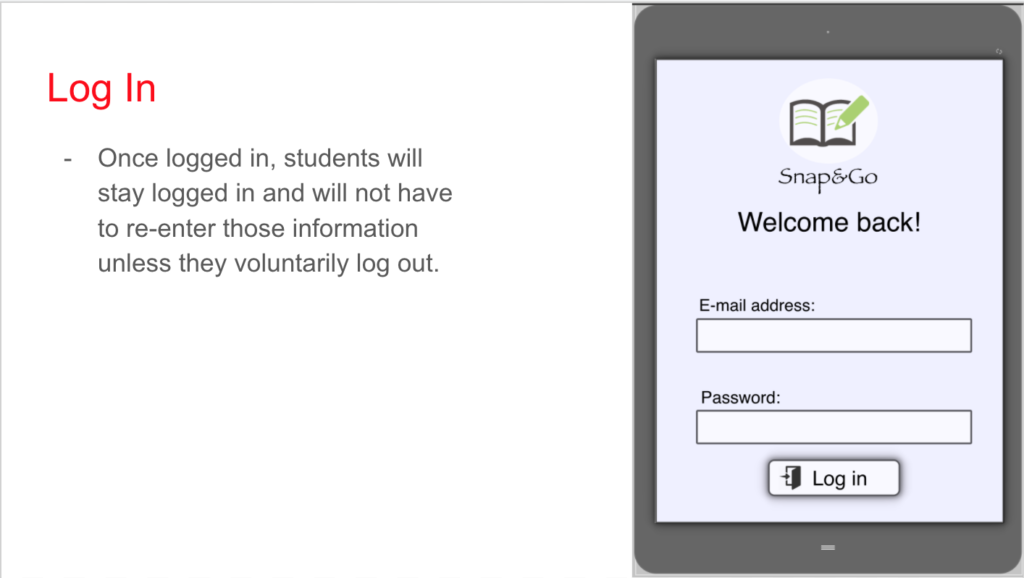
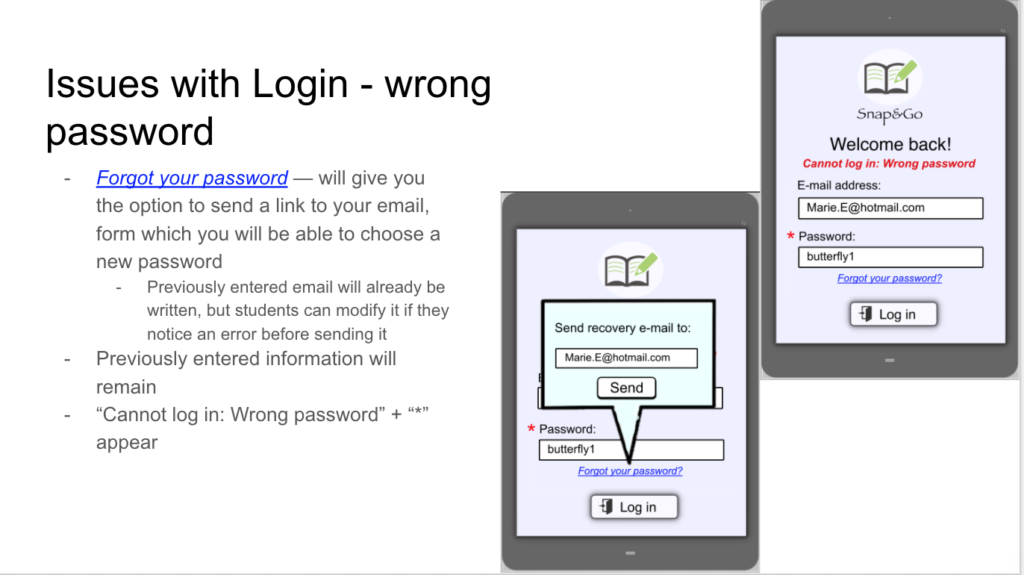
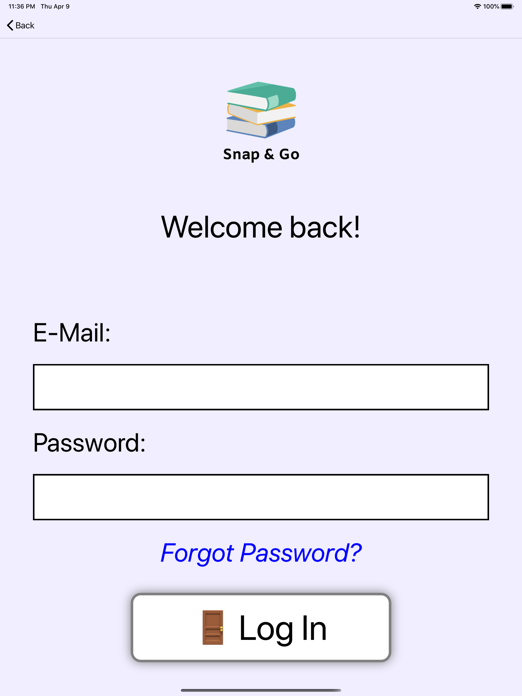
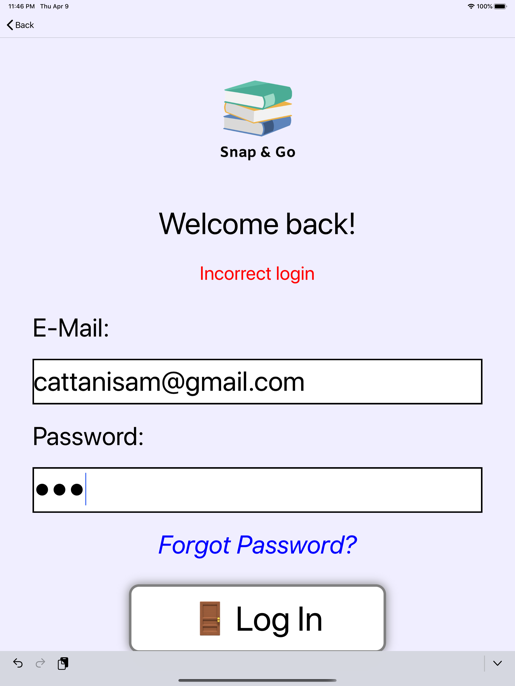
Logging In:
- Type your email address used with the account in the indicated space.
- Type your password in the indicated space.
* if this is the first time accessing your account and it was created by Summit School for you, your password is: “summit”.
- Press on Log in .
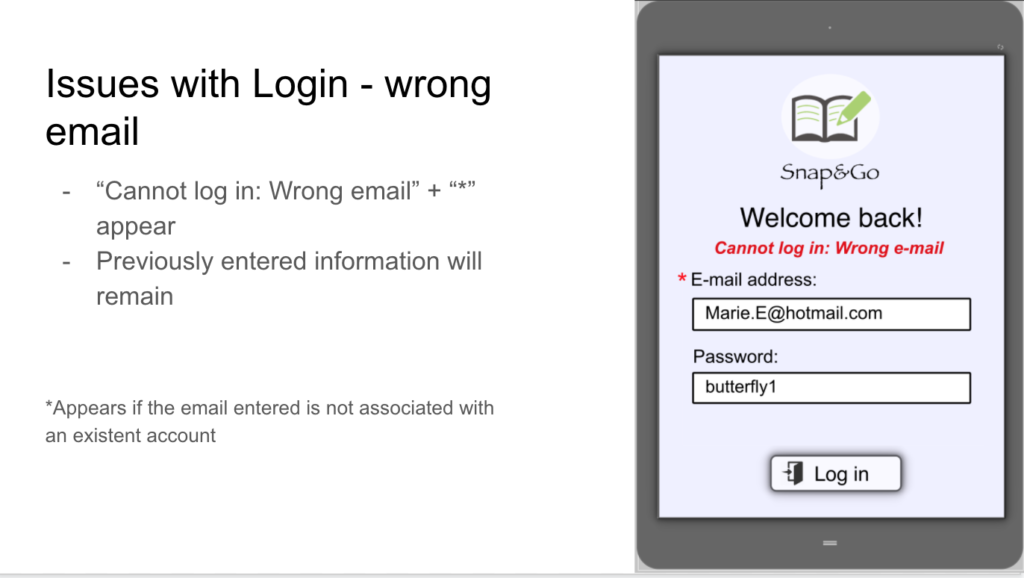
- If the page below appears, verify that you have the correct email and password associated with an existing account. You can then try again.
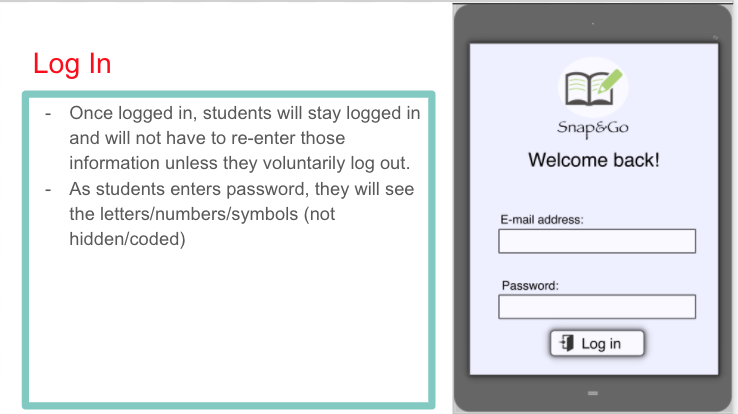
- Be mindful of the capital letters in your password (if any).
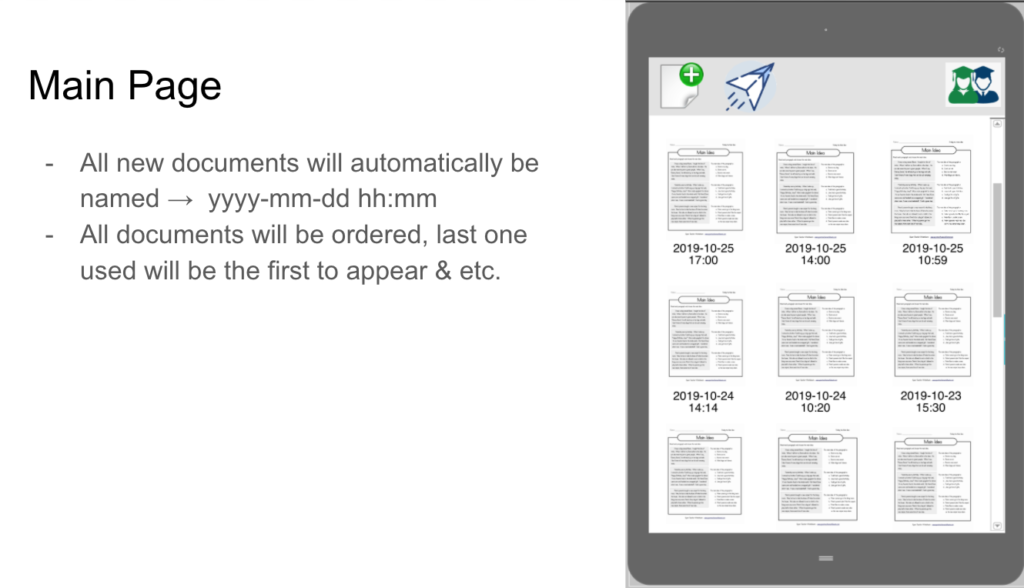
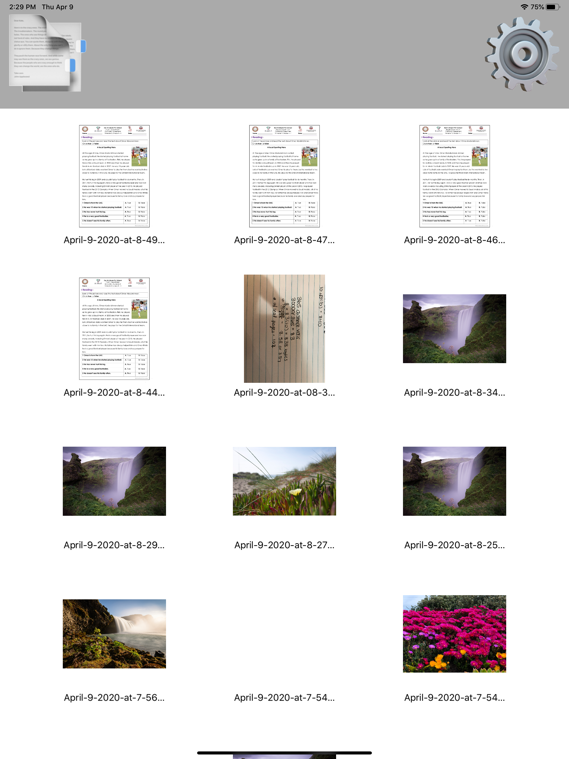
Main Menu
This is the page where you can see all the documents that you have created up to date. Your possible actions are the following:
- Create a new document by pressing on Create (
) in the top left corner.
- Access the settings by pressing on Settings (
) in the top right corner.
- Open an existing document in the Working Area by pressing on the document of interest (e.g.
).
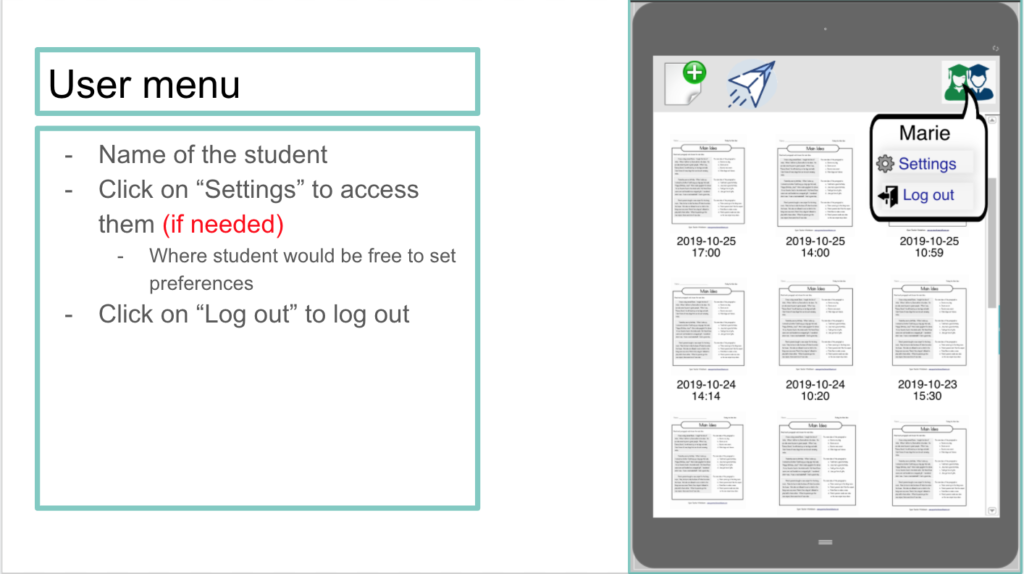
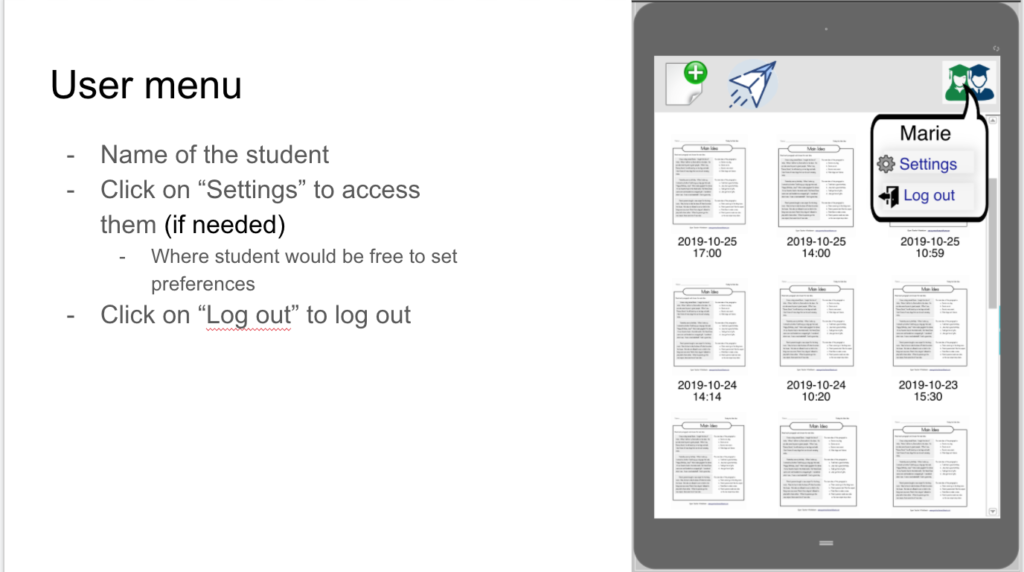
Settings Menu
On this page, you can do the following:
- Return to the Main Menu by pressing on the Back Arrow (
) in the top left corner.
- Log out from your account by pressing on Logout (
).
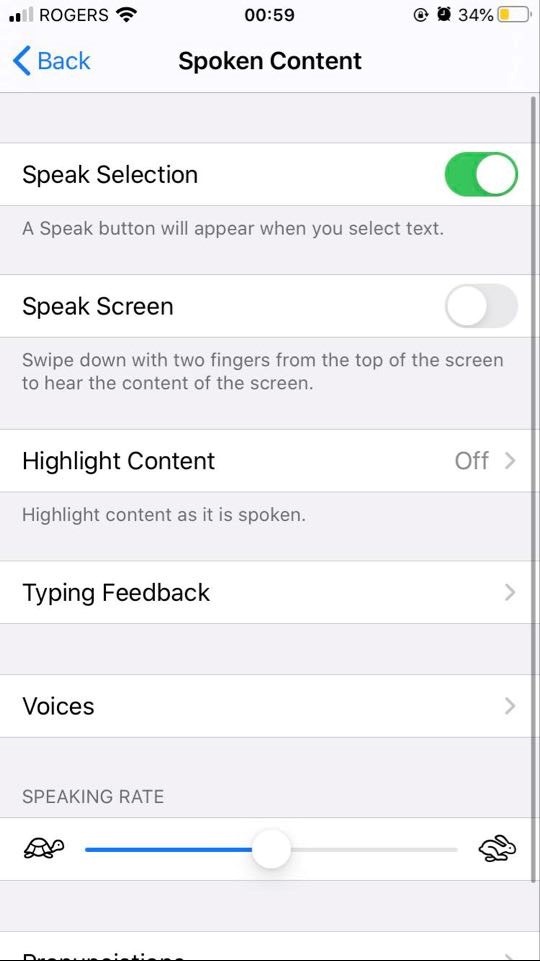
- Change the voice that is used in the text-to-speech option by pressing on Change Voice ().

Changing the Voice:
You will be taken to the Apple Settings Menu. From there, you can modify the voice settings to your desired preferences. These modifications will be applied to the text-to-speech function directly on Snap&Go.
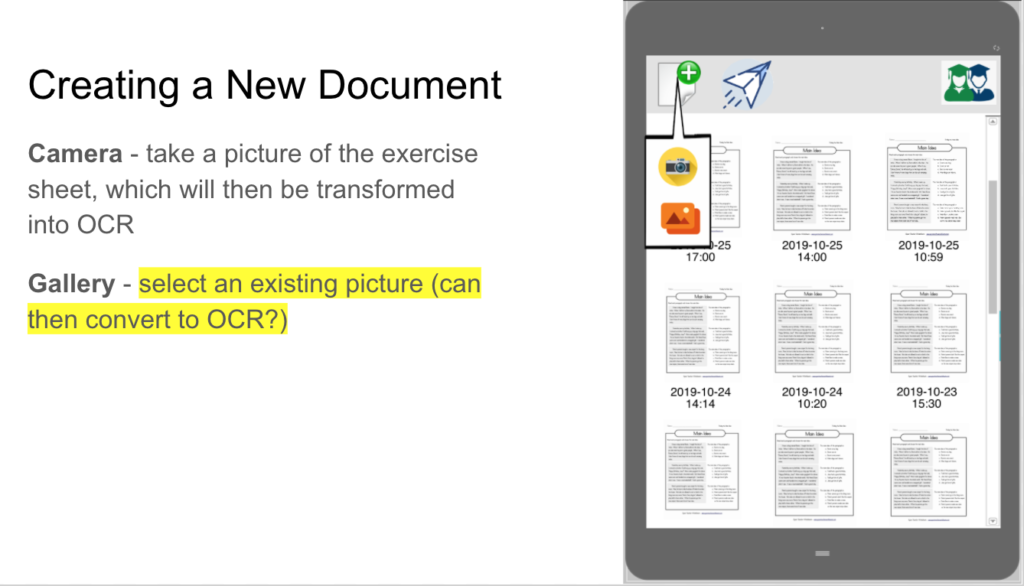
Creating a New Document:
After selecting this function, you will have 2 options to choose from:
- Create a new document from a new picture.
- Create a new document with an existing picture from your iPad’s Photo Gallery.
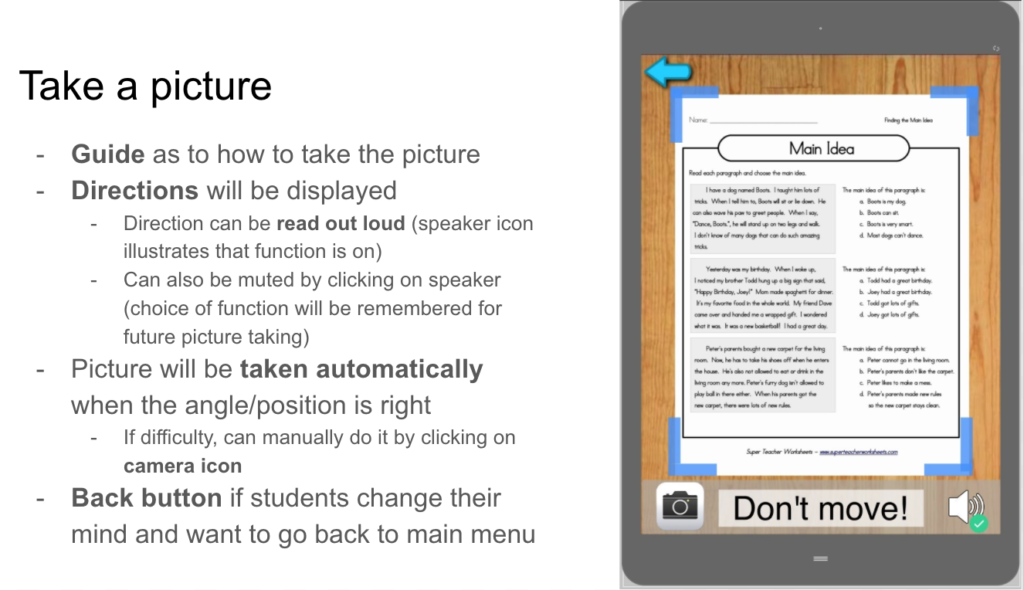
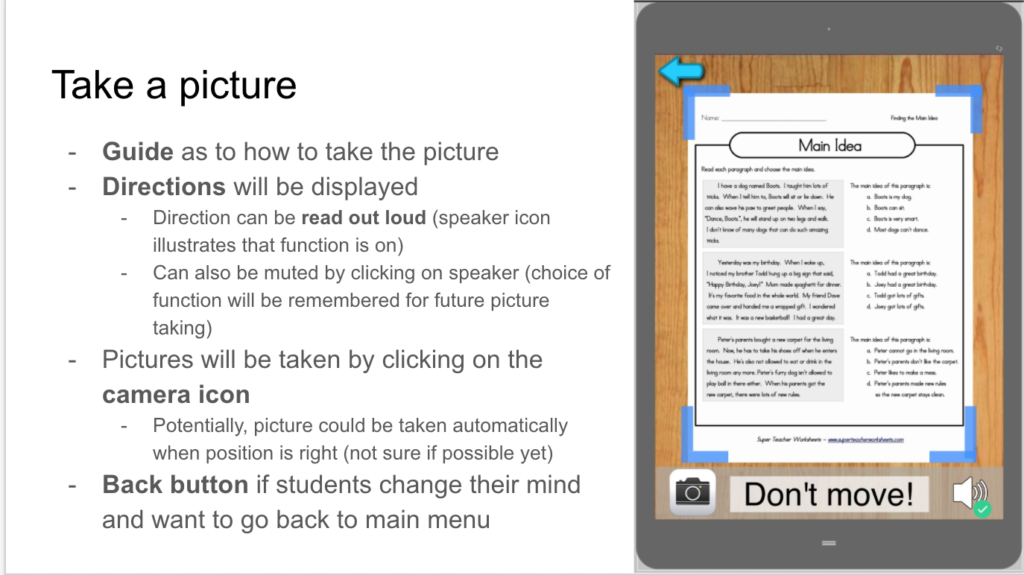
Creating a New Document with a New Picture:
This function will activate your camera, allowing you to take a picture of a worksheet. This new picture will then be transferred to the app allowing you to work freely on it.
- Take a picture of the document (e.g. worksheet) you want to be copied to Snap&Go.
- You will then be taken to a Preview Page where you will be able to see your picture be converted to a PDF file with machine-readable text data through OCR (optical character recognition). From there, once the converting is done, you can do one of the following:
- If you are not satisfied with the picture you have taken, you can return to the Main Menu by pressing on the Back Arrow (
), from where you will be able to re-do the process of step 1 and 2 written above.
- If you are not satisfied with the picture you have taken, you can return to the Main Menu by pressing on the Back Arrow (
*IMPORTANT* If you choose that option, the PDF file you see on the Preview Page will not be saved.
- If you are satisfied with the picture you have taken, proceed to the Working Area by pressing on the Forward Arrow (
). This PDF file will be saved.

Creating a New Document with an Existing Picture:
This function will take you to your iPad’s gallery, allowing you to take select to picture of a worksheet. This picture will then be transferred to the app allowing you to work freely on it.
You will be taken to your iPad’s gallery, from where you will be able to.
- Select the picture you want to be copied into Snap&Go.
- You will then be taken to a Preview Page where you will be able to see your picture be converted to a PDF file with machine-readable text data through OCR (optical character recognition). From there, once the converting is done, you can do one of the following:
- If you are not satisfied with the picture you have taken, you can return to the Main Menu by pressing on the Back Arrow (
), from where you will be able to re-do the process of step 1 and 2 written above.
- If you are not satisfied with the picture you have taken, you can return to the Main Menu by pressing on the Back Arrow (
*IMPORTANT* If you choose that option, the PDF file you see on the Preview Page will not be saved.
- If you are satisfied with the picture you have taken, proceed to the Working Area by pressing on the Forward Arrow (
). This PDF file will be saved.
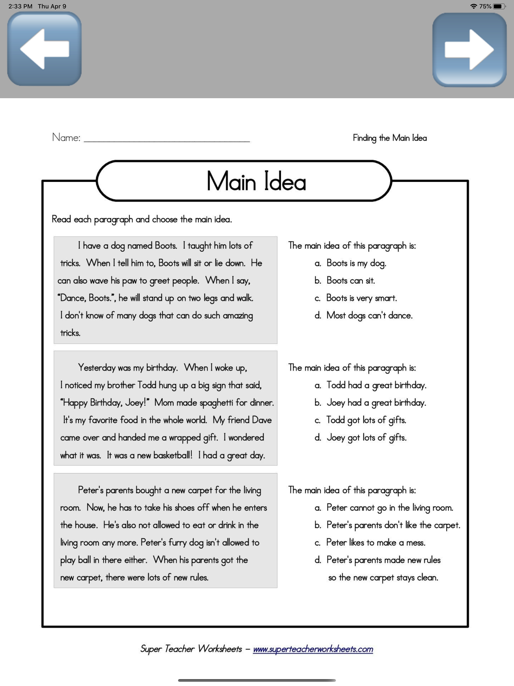
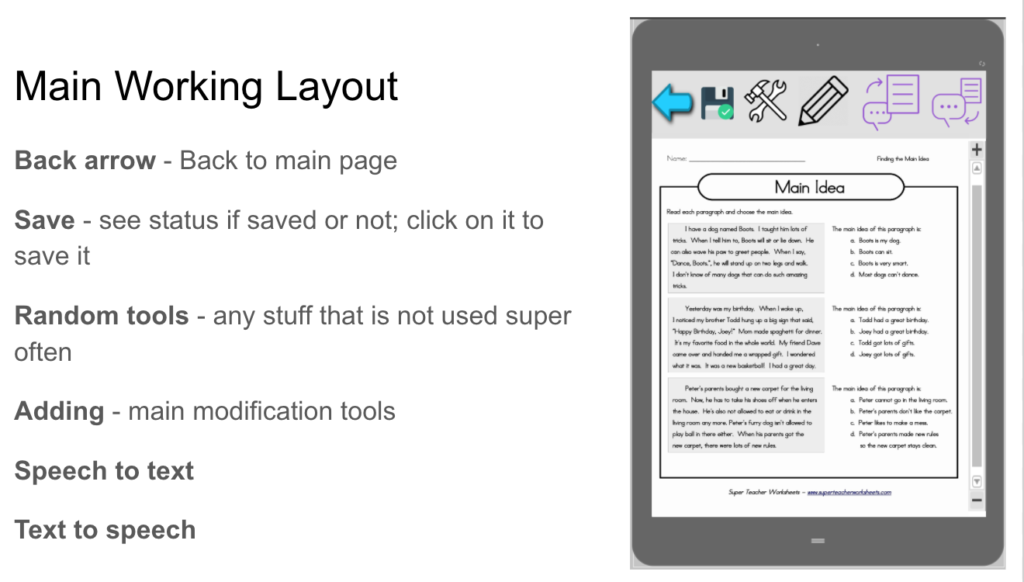
Working Area
This is the page where you can work on your documents. Your available actions are the following:
- Return to the Main Menu by pressing on Back Arrow (
).
- Save your document by pressing on Save (
).
- Add text to your document by pressing on Add Text (
).
- Hear written text on your document being read out loud to you by pressing on Text to Speech (
).
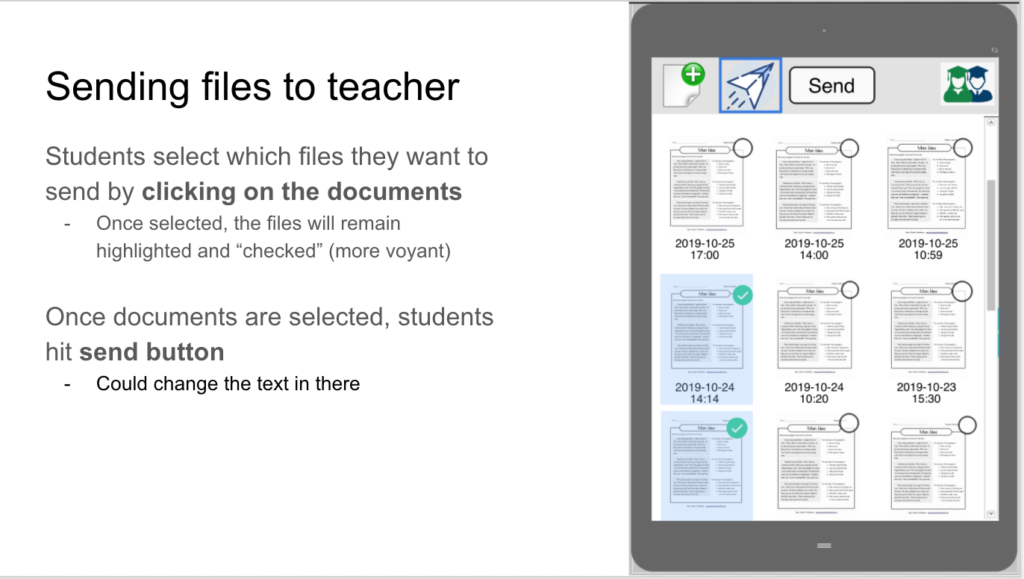
- Send your document to someone by email by pressing on Send document (
).

To save the modifications and progress on your document, press on Save
(). A spinning wheel will appear on the screen to indicate saving process. Once it disappears, it means that the modifications you brought to your document were successfully saved.
If you press on the Back Arrow () and return to the Main Menu without pressing Save (
), do not worry, your modifications will still be saved.
*IMPORTANT* However, your modifications will not be saved if you quit Snap&Go from the Working Area without saving.
- Press on Add Text (
).
- A text box will appear on your document, in which you can type what you want.
- Once you are done typing, to exit text box, press somewhere outside of the text box on your document.
You can move your text box by pressing on it again and dragging it across the page.
You can change the size of your text box by pressing on any of its corners and dragging it to fit the desired size.
You can modify the text you previously wrote in a text box by pressing directly on the text in the text box.
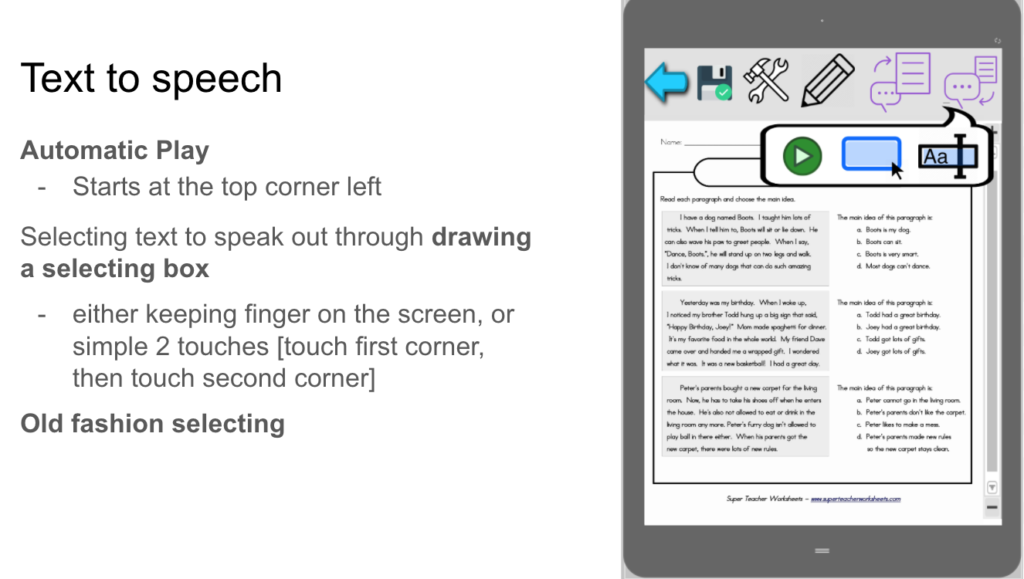
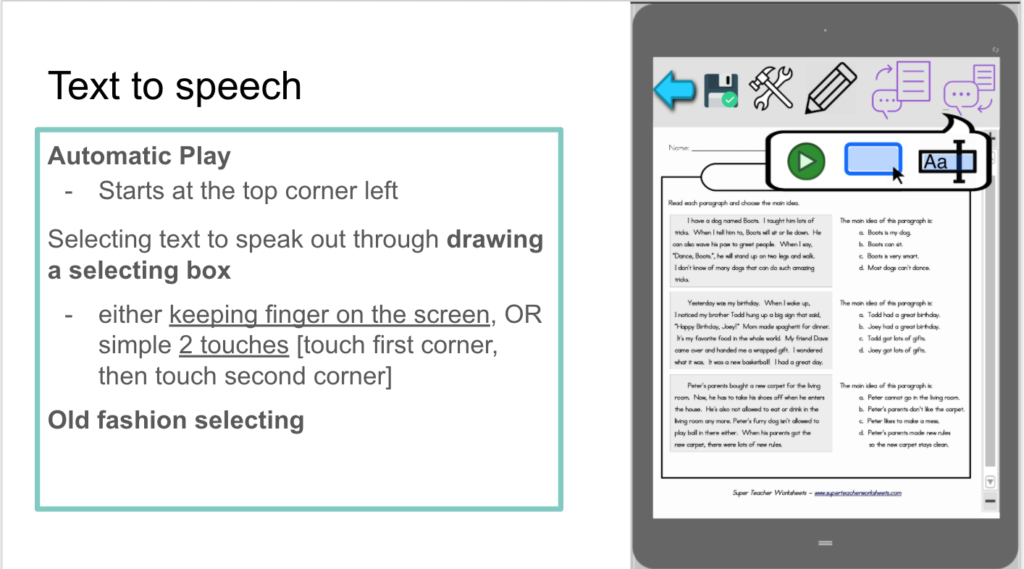
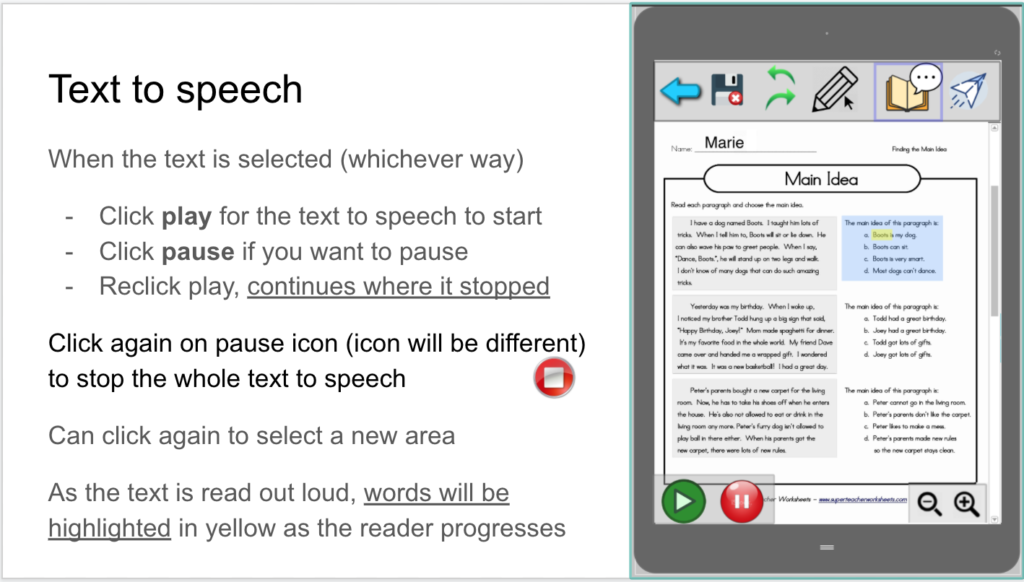
- Press on Text to Speech (
).
- You will have 2 options:
- Automatic Text to Speech (
) will make the iPad read out loud all the text that is found on the document, from top left to bottom right.
- Press on Automatic Text to Speech (
).
- The iPad will start to read all the text on the document.
- Press on Automatic Text to Speech (
- Selecting Text to Speech (
) will allow you to select the area you want the iPad to read from, from top left to bottom right.
- Press on Selecting Text to Speech (
).
- Select the area you want to be read out loud by making a rectangle through dragging your finger across the screen from one corner to its opposite corner.
- The iPad will start to read all the text on the document within the rectangle you just drew.
- Press on Selecting Text to Speech (
- Automatic Text to Speech (
For now, whichever version of the tool you decide to use, you cannot stop the iPad from reading the text you wanted until it completely finishes.

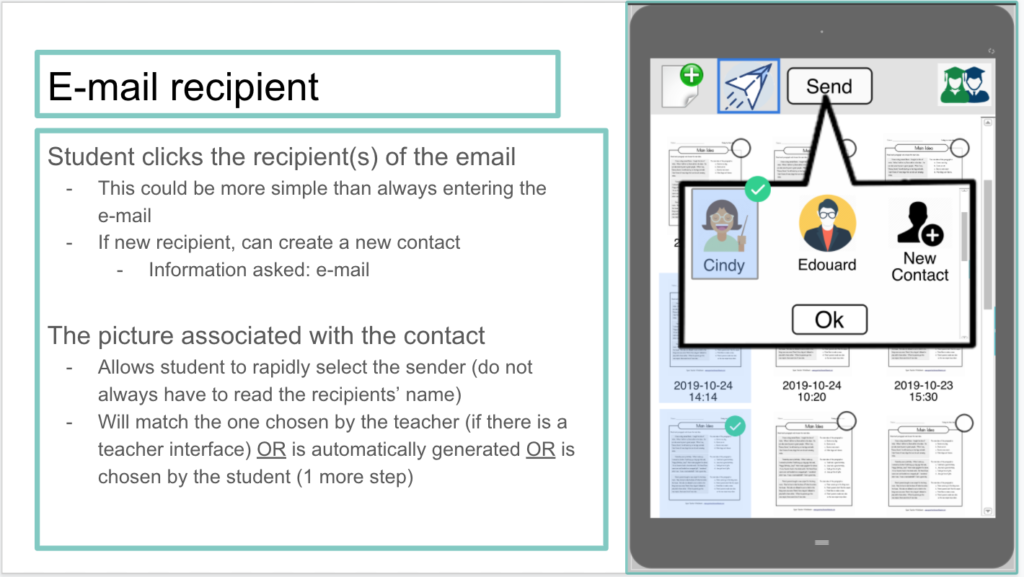
- Press on Send document (
).
- The window of your email service provider will open.
- The subject of your message will automatically be generated.
- The version of the PDF file you see (whether you pressed Save [
] before or not) will be attached to the email.
- Feel free to modify the subject and/or content of your email!
- Type in the email of the person you want to send your document to in the space provided (next to To:).
- Press on Send (
).

Administrative Web Application of Snap&Go
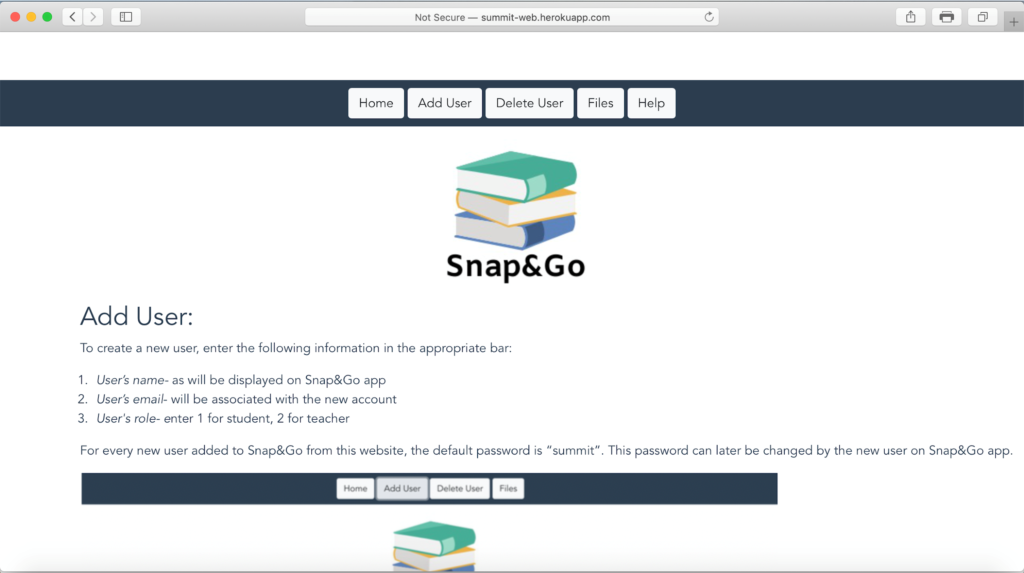
As an extension, a website was created for Summit School to give them the authority to create and delete members from a webpage, and to delete files from the database. Instructables on how to use this tool can be found directly on the website, in the Help page. We are still in the process of making this website password protected.
Home page:

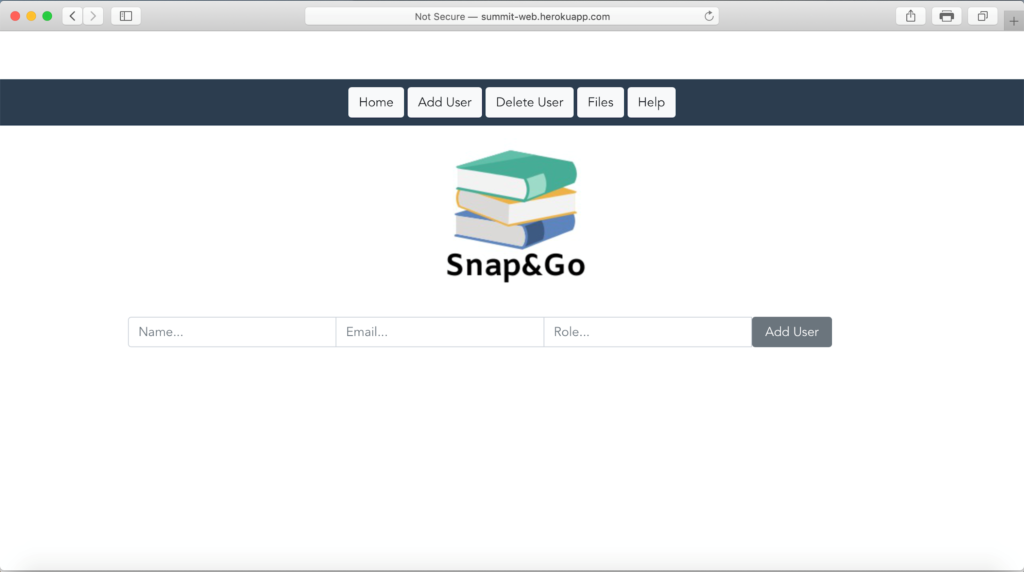
Add User page:
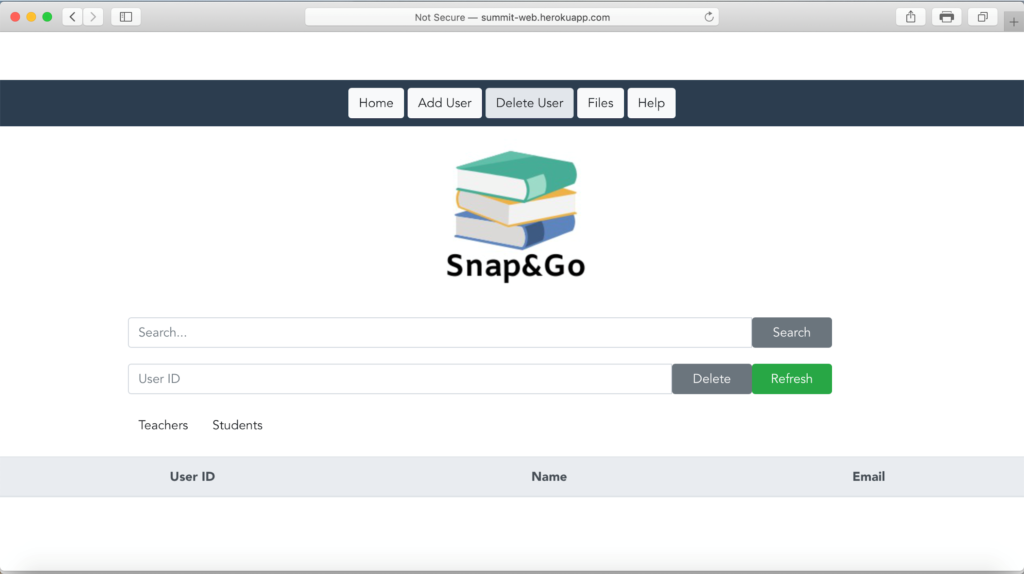
Delete User page:
Files page:

Help page:
E) Usage Instructions
You can download Snap&Go’s user manual here.
F) Fabrication / Installation
For source code of Snap&Go, please see:
Summit App Backend GitHub Link: https://github.com/cattanisam/SummitApp
Summit App iOS GitHub Link: https://github.com/cattanisam/SummitAppiOS
Web Application Github Link: https://github.com/donyahojabr/SummitWeb
No external files were required to create Snap&Go or the Administrative Web Application of Snap&Go.
G) Required Material
| Item — Vendor | Price | Notes | Links |
| Apple Developer Fee — Apple Inc. | 129$/year | Summit School has created their own developer account to publish the application | https://developer.apple.com/support/compare-memberships/ |
| MySQL — Oracle Corporation | - | Open-source relational database management system. | https://dev.mysql.com/ |
| Heroku — SalesForce Company | - | Cloud platform as a service supporting several programming languages. | https://www.heroku.com/ |
| Xcode — Apple Inc. | - | IDE (Integrated development environment) application that allows fo easier development of code, typically including a debugger, editor, and build automation. | https://developer.apple.com/xcode/ |
| Apple built-in OCR — Apple Inc. | - | Vision framework was implemented to do OCR. | https://developer.apple.com/documentation/vision?language=objc&fbclid=IwAR1sBtk6_2OzTNcEjxHNdeVM-kpg5KZRjewEeM2TTXUOnIvavhQdeYonJ3o |
| Amazon S3 (Amazon Simple Storage Service) — Amazon Web Services Inc. | - | Allows for document storing and retrieval through a web service. Includes APIs that are easily interacted with through user code. | https://aws.amazon.com/s3/ |
| PhotoScape X — MOOII Tech | - | Photo editing software. It was used to develop front-end mockups. | http://x.photoscape.org/ |
H) Helpful Contacts & Resources
As mentioned above, the creation of Snap&Go was made in collaboration with the Summit School team.
The following frameworks were used to develop app:
- JDBC (Java Database Connectivity): Application programming interface for the programming language Java, which defines how a client may access a database. It is a Java-based data access technology used for Java database connectivity. It is part of the Java Standard Edition platform, from Oracle Corporation.
- REST (Representational State Transfer): Used in the context of REST API. A web-based service that allows for data transfer.
- Vision: “The Vision framework performs face and face landmark detection, text detection, barcode recognition, image registration, and general feature tracking. Vision also allows the use of custom Core ML models for tasks like classification or object detection.”
For further questions about the design process, please contact:
Engineering students:
- Mary Jane Tucker: mary.tucker@mail.mcgill.ca
- Samantha Cattani: samantha.cattani@mail.mcgill.ca
- Donya Hojabr: donya.hojabr@mail.mcgill.ca
Occupational therapy student:
- Maï-Li Gravel: mai-li.gravel@mail.mcgill.ca
Snap&Go development team:
Mary Jane Tucker
Samantha Cattani
Donya Hojabr
Maï-Li Gravel
Snap&Go collaborators:
Summit School team